-
Dive into Core AI model authoring and optimization
Dive into the complete custom model deployment workflow for Apple silicon with the new Core AI framework. Discover powerful techniques for authoring models using custom Metal kernels, alongside platform-aware compression strategies. The new Core AI Debugger offers deep intrinsic analysis, and AI-assisted workflows guide you from initial concept to optimized on-device execution.
Chapters
- 0:00 - Introduction
- 1:49 - Models and skills
- 3:27 - Python workflow
- 5:54 - Model optimization
- 10:40 - Core AI Debugger
- 19:27 - Advanced authoring
- 20:43 - Custom Metal kernels
- 23:01 - Model re-authoring
- 28:46 - Next steps
Resources
- Core AI PyTorch Extensions
- Core AI Python
- Core AI Optimization
- Inspecting, debugging, and profiling Core AI models
- Inspecting Core AI models with Core AI Debugger
- Core AI
Related Videos
WWDC26
-
Search this video…
Hi. I'm Sachin, an engineer on the Core AI team, and later I will be joined by my colleague Nicole. Today, we look forward to showing you how Core AI makes it easy, to get your model running efficiently on Apple Silicon from the basics to more advanced approaches. As you saw in the "Meet Core AI" talk, Core AI is a complete suite of technologies, covering the model deployment lifecycle from model optimization and conversion to debugging and integration into your app.
In this talk, we will be zooming in on Core AI's Python ecosystem. You will meet the different libraries and tools that Core AI provides to get your models deployed on Apple Silicon.
You will also meet the Core AI Debugger, which can be an integral part of your workflow for understanding and debugging key issues. Lets dive in.
Here's our agenda. I will first introduce you to the Core AI models repository, and Core AI skills, powerful tools that will jump-start your journey. Then, I will show you the basic conversion and verification process. Core AI is built around the Python and PyTorch workflows you already know and if you've used Core ML before, a lot of this will feel pretty familiar.
I will follow that with model optimization, and show how you can make the right choices for your use-case and target platform.
To help you get a deeper insight into your model, Nicole will introduce you to Core AI Debugger. And finally, I will touch upon key ways that Core AI allows deep customization during model authoring and conversion. Okay. Lets start with models and skills.
At the forefront of Core AI's ecosystem, is the coreai-models repository. It includes a Swift package for running LLMs in your app. But at its core, its an open-source repository of models that are ready to go, including generative architectures like cutting-edge large language models.
We have examples engineered for various use-cases and constraints, along with components that you can use to bring your own models to Core AI. And last but not the least, Core AI models ships with a set of agent skills. You can install these skills into your favorite coding assistant, to get started with Core AI, just like an expert, from day one. Core AI skills work with you and translate your high-level ideas into a clear deployment plan for downstream tasks. They may get clarifications from you around the model you are interested in, the hardware families you are targeting, and the constraints your application has. These requirements inform the Core AI features you need, all the way from any changes in the PyTorch model code to conversion, optimization and running the models. AI skills give your coding agent access to the best practices and domain knowledge from our engineers. This empowers you to leverage Core AI like a pro, and even understand it better with your coding assistant! In fact, most of the code you will see throughout this talk was co-developed with an agent actively leveraging these skills.
Now, lets dig into converting and running models in Core AI with Python.
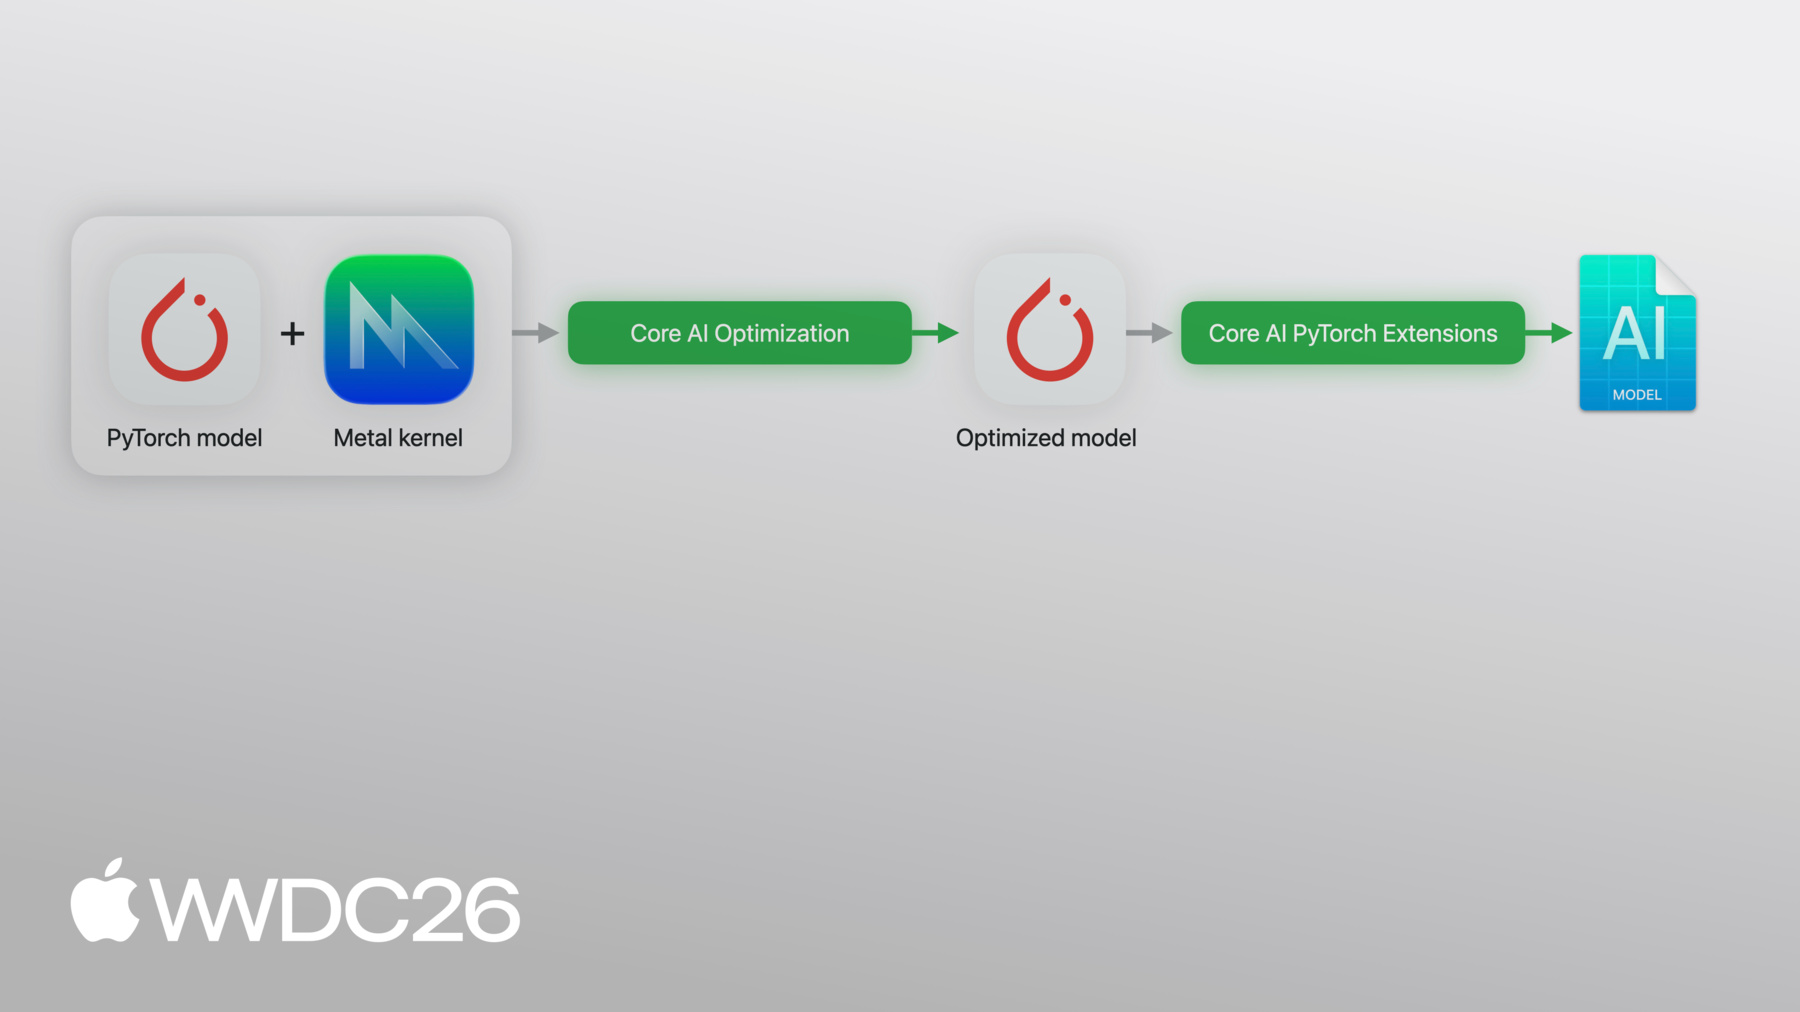
The Core AI Python libraries, primarily Core AI PyTorch extensions, are your entry point into the ecosystem. Installation is simple with pip install coreai-torch, this installs both the coreai package and the coreai-torch library building on top of it.
You hand coreai-torch a PyTorch exported program, and it converts directly to a Core AI model. It supports advanced features that let you tailor the Core AI program to your exact use-case. For example, you can assemble multiple models into a single artifact, register custom lowerings for specific operations, and inline Metal 4 kernels right into your converted model. And finally, you can specialize models into optimized assets, and run them natively on Apple Silicon entirely from Python.
Here's the pipeline I just described. Now, lets see this in practice.
I will walk you through a quick example. Here I have a neural network — two linear layers with a relu activation. Standard PyTorch. Then, I run torch.export, I pass the model and an example_input, which gives me an exported_program. This exported_program is the starting point for Core AI conversion. It captures the full computational graph: weights, operations and shapes in a format that coreai-torch can work with.
And now, the Core AI side.
Core AI's TorchConverter takes my exported program, along with the input and output names, and converts it to a core_ai_ program. If you've used CoreML tools before, this will feel familiar.
The converted model is then optimized and saved as an aimodel asset — an on-device format ready to run on Apple Silicon.
Once I have the specialized asset, I can load a function from the program and perform inference right from Python. You can also pass specialization options at this point to customize the process. To actually run inference, all you need to do is provide a dictionary mapping input names to corresponding numpy tensors! That's it… the whole workflow. Conversion, optimization and execution — all from Python.
Now let's talk about making a model smaller, using Core AI's optimization library. To showcase Core AI's optimization features, I'll be taking Segment Anything Model — SAM3 as the driving use-case.
SAM3 is an 850-million parameter model that performs prompt-based image segmentation. Before I can optimize the model, it's key to understand its internals at a high level. SAM3 has three main pieces. An Image encoder that processes the image. A Text encoder that handles the user's prompt. These two components combined make up 96% of the model's parameters so getting these right is key. And to complete the picture, a Detector module wrapping a DEtection TRansformer, combined with a mask decoder, produces the final output — the segmentation mask.
As you can see, SAM3 performs a complex, end-to-end task. And this is exactly the kind of use-case developers increasingly want to execute on-device.
To optimize this, I'll leverage Core AI's optimization library — called coreai-opt. Coreai-opt enables config-driven model compression, you describe what to compress and what to leave alone. It supports various optimization schemes, from which you can choose one to optimize differently for macOS versus iOS, as an example.
It also supports int4, int8, FP4 and FP8 weight compression with flexible granularity.
And finally, coreai-opt includes quantization APIs that you can either use with small amount of calibration data, or perform quantization aware training on larger data sets.
This is the simple pipeline I had previously. Now I am adding a step. Before conversion, I run the model through coreai-opt with a compression config or I can use one of their convenient presets. This gives me a smaller model that still goes through the same export pipeline. Let's try this on SAM3 and see what happens.
I start by wrapping SAM3 for export. This wrapper defines the interface for torch export to capture the full computational graph of the model.
And here's the conversion pipeline from the slides, wrapped into a reusable helper. A couple of interesting points though.
First, it runs decompositions in the PyTorch exported_program with Core AI's custom table. This ensures that high-level semantics that Core AI supports, like attention, are preserved in the graph.
Second, it also supports casting the program to 16-bit floating point using coreai-opt's helper, if needed.
The full conversion takes a few minutes, so I have pre-computed the baseline asset.
What I do here is load the baseline 32-bit converted model and run it.
As you can see, it's over 3 gigs in size. When I run, the default specialization kicks in to specialize and run the model.
This is my baseline. In this image, I ask for a segmentation mask over all the flowers. All are successfully detected based on the default threshold, running on-device. This is what I need to preserve after compression.
Now let's look at compression. coreai-opt ships with preset configurations. presets.w4 gives me 4-bit per-channel, symmetric quantization in one line.
I set ExecutionMode to EAGER, which works great for weight compression. For activations, I would use the GRAPH mode.
Then I initialize Coreai-opt's Quantizer with the config, pass example inputs and finalize — the model is then compressed.
As before, I load the model and run it on-device.
The model is now around 430 megabytes.
Look at the result. One of the occluded flowers is no longer detected.
I applied the same aggressive compression to every single layer, and its likely that not every layer handles this equally well. The question is — which layers are causing this? This is the kind of problem that's hard to diagnose from the output alone. I need to see inside the model. Let me hand it over to Nicole to show you how.
Thanks, Sachin! I'm excited to talk to you about Core AI Debugger. Now we've seen how to create and optimize your Core AI model. But, if you need a deeper understanding of your model and its behaviour you can use Core AI Debugger. Core AI Debugger is a new standalone application that can help you inspect your models on Apple platforms. With the debugger you can visualize your model's structure in an easy-to-understand graph format, execute your model on specific hardware for true runtime results, and validate inference correctness against a reference run — all in one place. I'm excited to show you Core AI Debugger in action and figure out what happened when the SAM3 model was quantized. I'll start by opening the original model and click Inspect to get started.
Now that the model is open, I can see the debugger workspace. On the left is the navigator which contains a structured list of operations in the model.
These operations are grouped by their PyTorch module, which is especially powerful for larger models like SAM3 and allows you to navigate your model in a way that feels familiar.
Selecting a PyTorch module in the navigator, like the detector decoder, will highlight all of the corresponding nodes in the structure viewer at the top of the workspace. This view shows you a graphical representation of your model and provides a clear picture of operation connectivity, execution order, and data dependencies. And, with the source viewer at the bottom, I'm always grounded in my model's original Python code down to the specific line.
Finally, I can learn even more about an operation by selecting it and opening the inspector on the right. Here, I can find a description, and additional details on the operation's inputs and outputs.
Together, these views allow you to move fluidly between graph structure, source code, and execution details, which dramatically reduces the cognitive overhead of debugging complex models like SAM3. Beyond static analysis, the debugger enables runtime analysis of how your model actually executes on-device. This will be especially helpful for tracking down where quantization has caused a problem. To run the model, I'll click device at the top of the workspace. In the scheme settings, I'll pick my Mac from the list of targets, then specify the inputs I want to provide to the model. Starting with the pixel values, then the input_IDs, and the attention_mask.
Finally, I'll click Run.
SAM3 is now being specialized to run on my device. Now that it's ready, the structure viewer has updated to show me the model, exactly as it would run on my Mac. And I can now click on any operation to see its output tensor directly in the inspector. Without needing to modify anything. Back to the problem at hand, I first want to verify the final detection masks. So I'll scroll to the end of the model and select the final operation.
In the inspector, I'll click on the tensor preview to get a closer look at the mask. I can see the flowers, but just like in the notebook, one is missing.
Now I want to understand how these results compare with the original PyTorch run. I'll return to my notebook and use the NEW save intermediates API. This API executes a PyTorch model and captures intermediate tensor values at each operation. I want to compare my quantized results with the baseline Sachin showed earlier, so I'll pass in the int4 model alongside the original SAM3.
I'll let it run and now that the intermediates are saved, I'll return to the debugger to compare the results. I'll start by clicking the comparison icon at the top of the workspace to initialize a new comparison session. On the left is the existing configuration I specified earlier. On the right, I can choose another configuration to compare against like a different Target or Compute Unit. In this case, I'll click Target and load a reference run from an Intermediates File.
I'll use the file I just exported and start the comparison.
The navigator is now populated with operation pairs which combine an operation from the specialized model and PyTorch model.
These pairs are called sync points, places where the specialized model's output is expected to match the original PyTorch result. The debugger automatically identifies these points throughout the model to make the comparison process easy.
Each sync point is paired with a metric indicating how similar the two outputs are which makes it trivial to find where they diverge. The default metric is a peak signal-to-noise ratio or PSNR, but this can be changed to witchever similarity indicator suits your model best. For SAM3, I'll stick to PSNR.
The value of the similarity metric can also be quickly gleaned from the status indicator on the right or from the graph itself: green nodes indicate similar tensors, red nodes would indicate significant differences.
As I scroll through the operations, I'm seeing several yellow sync points, which indicates that parts of my model have moderately diverged from the expected result. I'll sort by similarity, and investigate the most dissimilar sync points.
When I click on a sync point in the navigator, the source viewer updates to show me the operation's PyTorch module hierarchy. For example, this operation came from the detector decoder. I'll use the up arrow key to navigate through the low-PSNR sync points one-by-one to see if a pattern emerges.
I'm noticing that the vast majority of low-PSNR sync points are actually coming from the detector decoder. This tells me that the quantization scheme applied earlier has mildly corrupted the detector results. Since we previously identified that the detector block only accounts for 4% of model parameters, we're not getting much benefit from compressing it anyway. So, I'll return to the Jupyter notebook, and try changing the quantization scheme to ignore the detector.
Now that the new scheme has been applied, I'll re-export the model and verify if the change worked.
Great! I can see that we have once again reached baseline quality where all flowers are detected and the model is only a fraction of the size! Core AI Debugger turned hours of manual tensor comparison into a visual diagnosis. I started with missing detections and reached a revised quantization scheme in minutes. Beyond what I showcased today, Core AI Debugger is capable of solving increasingly complex issues. It gives you deep visibility into how your models behave, enabling greater confidence when bringing your model to Apple platforms. Now, back to Sachin.
Thanks Nicole! Now let's take things a step further. So far, I have been converting the model as a single, end-to-end unit. And for a lot of models, that works just fine. But it may not always be enough, depending on your use-case and especially your constraints. And this is where Core AI really empowers you to dig deeper. Concretely, I will now be zooming in to the PyTorch source itself which defines a graph of computations from inputs to outputs. What advanced model authoring implies, is that you look inside this computational graph and really tune how it runs on the hardware. As a simple example, let's consider this series of operations. You can take a group of those ops and fuse them into a single operation This replaces several steps with a single kernel dispatch within the graph. Core AI already ships with pre-packaged fast kernels and primitives for heavy operations like Scaled Dot Product Attention, commonly found in Transformers. You can find examples of how to leverage these operations in the coreai-models repository. But if you live on the cutting edge and want even more customization, we also have support for custom Metal 4 kernels.
Coming back to my pipeline. Here's what changes with custom Metal kernels. I am adding a second input to coreai-torch. My kernel's source code written in the Metal Shading Language, or MSL. The converter takes both my PyTorch model and my custom kernel, and bundles them together into a single asset. The MSL is embedded right inside. It ships with the model. Let me show you what that looks like in code. First, I define a PyTorch reference for our example. A standard Sigmoid Linear Unit, or SiLU. It's a common activation function used in generative transformer models. This is what torch.export sees during tracing. Below that, I implement the actual Metal kernel in MSL. This is a simple element-wise kernel, one thread per element, that computes the fused activation directly on the GPU. With just these two pieces, I can now register a Core AI TorchMetalKernel, give it the Metal source, the PyTorch reference and the input and output names. In this case, the input and output names are "x" and "y" respectively, and you can see those names being used in the MSL kernel above. So you write the Metal. You write the PyTorch reference. And Core AI binds them together. Using it in a model, I will just call it like any other Python function. Pass the input, specify the thread grid and I am done. One thing to note, is that I pass in the result shapes to every instantiation of the custom kernel in the PyTorch source. This allows Core AI to bake in the computation of the output shapes of the kernel from the input shapes, if your model has dynamic shaped inputs.
When I convert with TorchConverter, I register my custom kernels with the converter, then add the exported program as before. The Metal source gets embedded directly in the asset a single artifact. The kernel travels with the model.
For more details on how you can write efficient Metal kernels for Core AI, and to see an optimized kernel live in action with the SAM3 model please see the "Optimize custom machine learning operations with Metal tensors" talk.
So far, I showed how you can take multiple operations in the graph and fuse them into one. But for more advanced optimizations, especially for iOS, you need to go further and rewrite the entire model with a specific target in mind. We refer to this process, as model reauthoring. Back to our simple series of operations. Re-authoring typically involves replacing many aspects of this computational graph. This may imply using different operations, novel tensor layouts, and even modifying the interfaces of the model. Essentially, this is a completely different implementation of the source code.
Digging deeper, what does this kind of authoring involve? One example, is using predefined patterns in the PyTorch code that tell Core AI about a specific concept. This allows the framework to map these semantics to an optimized implementation at runtime. An example of this, is in-place updates of the Key-Value cache commonly used in Large Language models. Another mechanism used, especially when targeting iOS, is the usage of static tensor shapes, channels-first tensor layouts and convolutional op patterns. These enable Core AI to leverage powerful underlying primitives and meet your on-device constraints. When you engineer a novel PyTorch implementation in this way, its crucial that you employ rigorous testing both at the module level and at the model level. This ensures that individual building blocks, as well as the entire model work as intended. This testing can take the shape of unit tests or integration tests. To get you started, the Core AI models repository includes multiple examples of such reusable components and best practices across different models. Core AI skills also enable your coding assistant to write PyTorch code optimized for Apple Silicon from day one. Let's continue with SAM3. Instead of converting the model as-is, I can author a new PyTorch implementation that's hand-crafted for my goals. The biggest change I make is to have three separate functions in the Core AI Model instead of one. Coreai-torch has APIs that lets you do this. Image Encode handles the image, Text Encode processes the prompt, and Detect wraps the final post-processing to generate the output. Splitting the work this way allows me to run each bit at a different cadence. For example, I may want to process a single prompt once and use it across a variety of images in your application. It also gives each function a clean interface, and lets me compress and author each one independently. Lets see this in practice. Here's the attention block from the Image Encoder transformer, rewritten for power-efficient execution on iOS.
Instead of standard Linear layers, I use convolutional projections. This is one of the patterns that lets Core AI leverage native hardware primitives on the right compute unit. The text encoder gets a similar treatment. The smaller decoder stays mostly unchanged. It's a small fraction of the compute, so the payoff from re-authoring it is minimal.
I structure the re-authored model as three independent modules. ImageEncoder, TextEncoder and the Detector. As mentioned earlier, this separation lets me use different aspects of the model uniquely.
For compression, I apply 4-bit palettization with per-channel scales to the two encoders. There is a preset available for this, but I use the lower-level representation here to showcase the APIs. This lookup-table-based compression, is well-suited for power efficiency on iOS.
As before, I construct a KMeansPalettizer similar to the Quantizer, and pass it the model and config. Then, I prepare and finalize. Also note, that I changed the input image size from 1008 pixels to 336 to run on an iPhone.
The detector stays uncompressed. I know that its sensitive to compression from our previous exercise.
I then run each model through torch export. All of them get cast to half-precision.
And here's where it comes together. A single TorchConverter, three exported programs, each with its own entrypoint name.
First, image_encode. Then, text_encode. And finally, detect.
When saved, I get one model asset with three callable functions inside.
Now, lets load and run the pre-computed asset.
First, I see all the flowers segmented as expected.
And here's the payoff of the three-function split. I swapped the prompt to butterfly and only re-ran the text encoder and the detector.
As a result, the second inference is 76% faster, even after warmup. This shows the benefit of re-authoring.
So, here's what you can do today. Convert your PyTorch models using Core AI's Python libraries. Optimize them with coreai-opt, and use the debugger when you need to understand what's happening inside. Build on top of the examples in coreai-models. And plug in Core AI Skills into your favorite AI agent to leverage the new framework like an expert. I look forward to seeing what models you bring to the platform! Thank you!
-
-
3:27 - Define and export a PyTorch model
import torch import torch.nn as nn # Define a simple model class MLP(nn.Module): def __init__(self): super().__init__() self.fc1 = nn.Linear(256, 512) self.fc2 = nn.Linear(512, 10) def forward(self, x): return self.fc2(torch.relu(self.fc1(x))) # Export with torch.export model = MLP().eval() example_input = (torch.randn(1, 256),) exported_program = torch.export.export(model, example_input) -
4:02 - Convert, optimize and run inference with Core AI
import coreai import coreai_torch from coreai.runtime import NDArray # Convert to Core AI converter = coreai_torch.TorchConverter() converter.add_exported_program( exported_program, input_names=["features"], output_names=["logits"]) core_ai_program = converter.to_coreai() # Optimize and save to .aimodel core_ai_program.optimize() asset = core_ai_program.save_asset("mlp.aimodel") # Run inference specialized_model = await AIModel.load("mlp.aimodel") specialized_function = specialized_model.load_function("main") result = await specialized_function({"features": NDArray(example[0].numpy())}) -
21:12 - Define a SiLU Metal kernel with PyTorch reference
import torch from coreai_torch.dsl import TorchMetalKernel, MetalParameter def silu_torch(x): return x * torch.sigmoid(x) SILU_MSL = """ float val = float(x[gid]); float sig = 1.0f / (1.0f + exp(-val)); y[gid] = TYPE(val * sig); """ silu_kernel = TorchMetalKernel( name="fused_silu", input_names=["x"], result_names=["y"], src=SILU_MSL, torch_defn=silu_torch, metal_params=[MetalParameter("gid", "uint", "thread_position_in_grid")], template_dtypes={"x": "TYPE"}, ) -
22:09 - Use a custom Metal kernel and convert with TorchConverter
class MyModel(torch.nn.Module):
    def __init__(self):
        super().__init__()
        self.linear = torch.nn.Linear(256, 256)

    def forward(self, x):
        h = self.linear(x)
        n = h.numel()
        return silu_kernel(
            h,
            threads_per_grid_size=(n, 1, 1),
            threads_per_thread_group=(min(n, 256), 1, 1),
            result_shapes=[h.shape],
        )

exported_program = torch.export.export(MyModel(), (torch.randn(1, 256),))

converter = coreai_torch.TorchConverter()
converter.register_custom_kernels([silu_kernel])
converter.add_exported_program(exported_program,
                               input_names=["x"], output_names=["y"])
deployable = converter.to_coreai()  # MSL integrated into asset
-
-
- 0:00 - Introduction
Overview of Core AI's complete Python ecosystem for model deployment on Apple Silicon — covering the model lifecycle from optimization and conversion through debugging and app integration.
- 1:49 - Models and skills
Introduction to the coreai-models open-source repository — ready-to-go model architectures, reusable components, and agent skills you can install into your coding assistant to leverage Core AI best practices from day one.
- 3:27 - Python workflow
How to convert a PyTorch model to Core AI using coreai-torch — exporting a program with torch.export, running TorchConverter with input/output names, saving as an .aimodel asset, and performing inference from Python with numpy inputs.
- 5:54 - Model optimization
How to compress models using coreai-opt's config-driven optimization library — demonstrated on SAM3 (850M parameters) using int4 per-channel symmetric quantization presets, reducing the model from 3GB to 430MB, and understanding the trade-offs of aggressive uniform compression.
- 10:40 - Core AI Debugger
Introduction to Core AI Debugger — a standalone app for inspecting models on Apple platforms. Covers the navigator (PyTorch module hierarchy), structure viewer (operation graph), source viewer (original Python code), inspector (tensor details), and how to run a model on-device to inspect intermediate tensor outputs.
- 19:27 - Advanced authoring
How advanced model authoring goes beyond end-to-end conversion — fusing multiple operations into a single kernel dispatch, and leveraging Core AI's pre-packaged fast kernels for heavy operations like Scaled Dot Product Attention.
- 20:43 - Custom Metal kernels
How to embed custom Metal Shading Language kernels directly into a Core AI model asset — writing a PyTorch reference function alongside an MSL kernel, registering a TorchMetalKernel with TorchConverter, and shipping the kernel bundled inside the .aimodel file.
- 23:01 - Model re-authoring
How to re-author a PyTorch model from scratch for power-efficient execution on iOS — demonstrated on SAM3 by splitting into three independent functions (image_encode, text_encode, detect), using convolutional projections and channels-first layouts, applying 4-bit palettization to the encoders, and achieving faster second inference by reusing cached image embeddings.
- 28:46 - Next steps
Summary of the Core AI Python toolchain: convert with coreai-torch, optimize with coreai-opt, debug with Core AI Debugger, build on coreai-models examples, and use Core AI Skills in your coding agent.