-
Elevate your app’s text experience with TextKit
Discover how to combine the convenience of built-in text views with the control of TextKit. We'll show you how new APIs make it easy to extend UITextView and NSTextView with custom behaviors like line numbers and collapsible sections. We'll also explore the TextKit architecture and walk through new caching and reuse policies for text attachments. To get the most out of this session, watch “Meet TextKit 2” from WWDC21 and “What's New in TextKit and text views” from WWDC22.
Chapters
- 0:00 - Introduction
- 3:09 - TextKit architecture
- 9:17 - What's new in TextKit
- 11:27 - Extending framework text views
- 12:58 - Example: Code editor with line numbers
- 17:52 - Example: Collapsible recipe sections
- 19:56 - Text attachments and view provider reuse
- 23:00 - Next steps
Resources
Related Videos
WWDC26
WWDC22
WWDC21
-
Search this video…
Hello, and welcome to "Elevate your app's text experience with TextKit." I'm Tarun Uday, an engineer on the TextKit team.
TextKit is Apple's next generation text engine, and the foundation of text layout and rendering across all of Apple's platforms.
Text controls in SwiftUI, UIKit and AppKit all use TextKit to lay out and render their text content. In this video, I want to talk about something we've been hearing from developers for a while, a tension between convenience and control, and the new APIs we've built to resolve it.
If you're building a text editing experience on Apple platforms, you have two paths. The first path is to use the framework text view. That's NSTextView in AppKit, UITextView in UIKit and TextEditor in SwiftUI.
With these, you get an incredible amount for free.
Text input, selection, accessibility, undo and redo, dictation, inline predictions, and more. These text views use TextKit internally, but that internal implementation is mostly hidden. You have limited ability to customize how the text is drawn or how the viewport manages its visual elements.
The second path is to use TextKit as the text engine, and render the text in a view or a layer directly. We call this a custom text view to differentiate them from the prepackaged framework text views. You set up an NSTextLayoutManager, implement viewport layout on your own view or layer, and handle all the rendering yourself.
When you build custom text views, you get total control over the storage, layout, and the viewport layout process, but you give up everything that the framework text views provide. And building a production-quality text editing experience from scratch is a lot of work. For some scenarios though, choosing between the convenience of a framework text view, and the control of a custom text view has been difficult. Today we'll look at how we can get the best of both worlds.
For an in-depth introduction to the TextKit architecture and custom text views, watch, "Meet TextKit 2," from WWDC21. And for details on how framework text views adopted TextKit, watch, "What's new in TextKit and text views," from WWDC22. While this talk is self-contained, these two sessions will give you a deeper foundation for everything we cover today.
I'm going to start by giving you a recap on TextKit's architecture. Later on, I'll talk about some new API we've introduced in TextKit.
At the very end, I'll show you new ways of extending text views, using some examples.
Understanding the TextKit architecture is pivotal to making a great custom text experience. Let's start there.
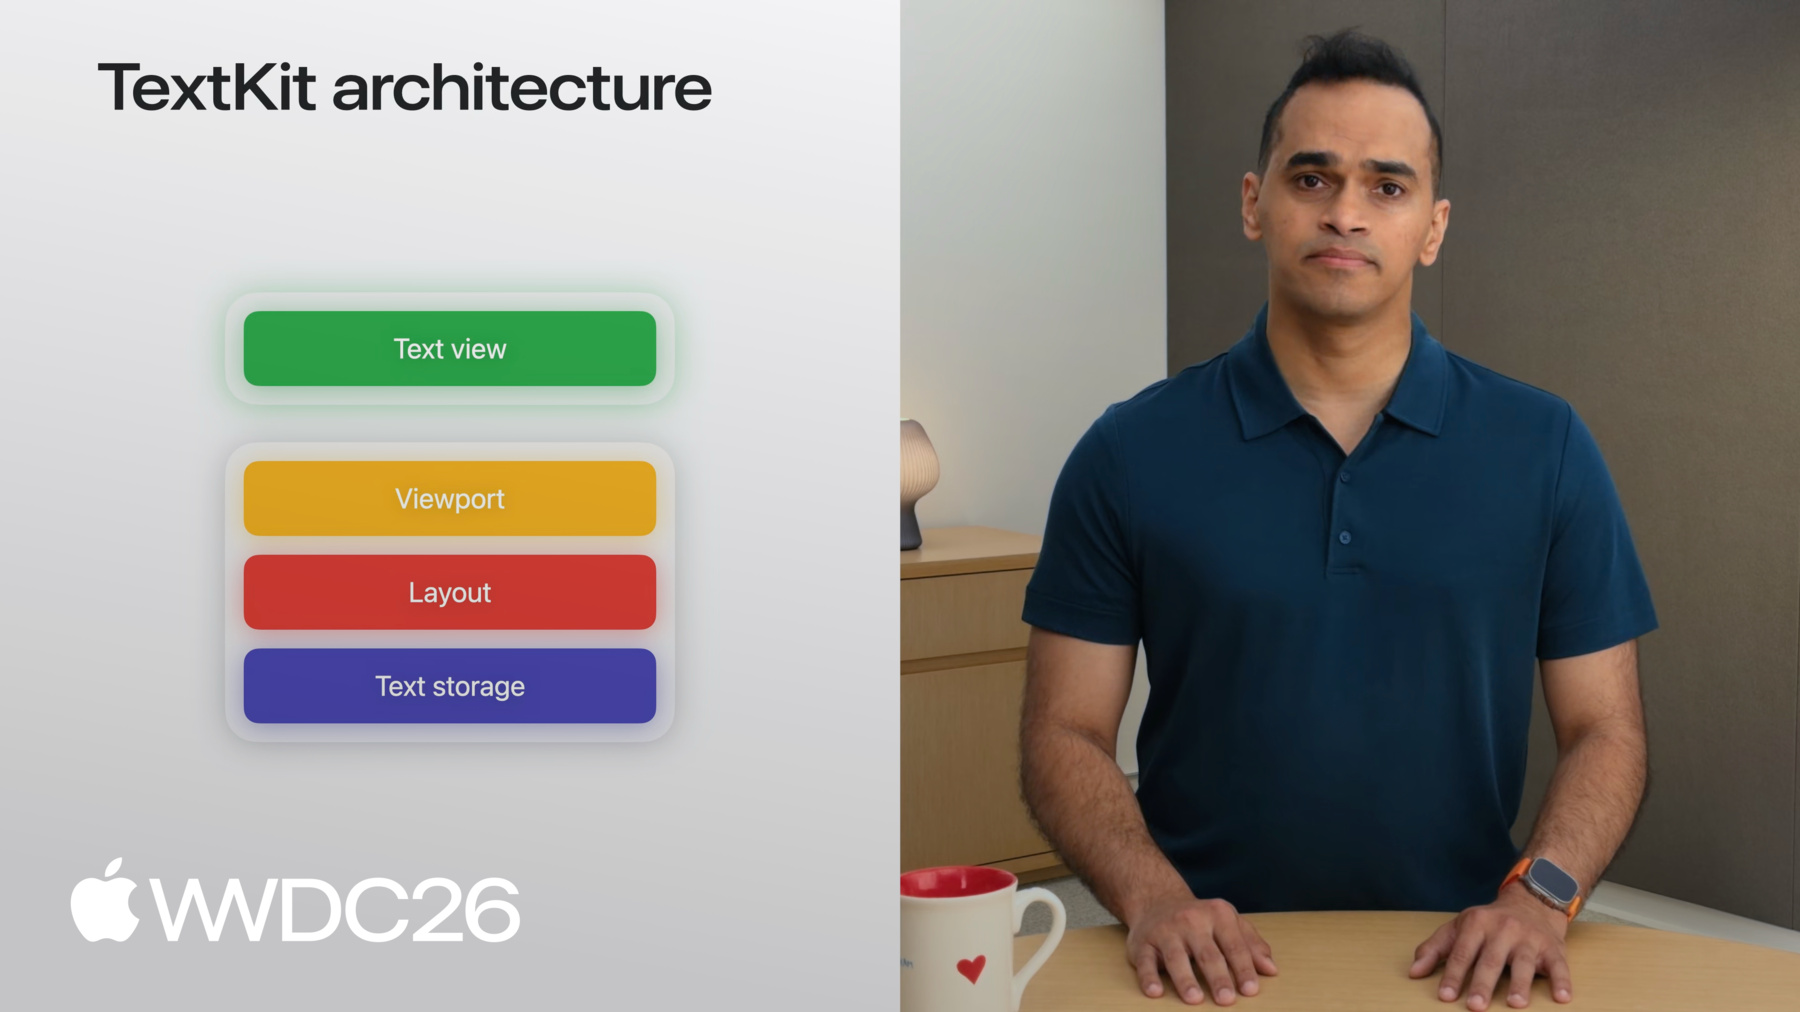
TextKit uses a four-layer architecture for text rendering.
At the base is the text storage layer. This encapsulates all the text data to be rendered.
The layout layer sits on top of the text storage. It's responsible for breaking the text into chunks for rendering.
Next, is the viewport layer. This keeps track of which of the chunks from the layout are visible.
At the top is the view layer. This is where the text appears in your app.
The storage, layout, and viewport layers are shared across all of Apple's UI Frameworks. You can use these shared layers to render text on any view or view-like drawable visual element provided by a UI Framework.
Next, I'll cover how each layer works. By understanding the pieces that make up each layer, you can customize TextKit to create unique experiences in your apps.
To do that, I'll use the example of rendering a long NSAttributedString in a custom text view. Text content storage is responsible for breaking this attributed string into paragraphs. For this example, the text content storage creates NSTextParagraph objects for each paragraph of the underlying attributed string. NSTextContentStorage and NSTextParagraph are concrete types that work with NSAttributedStrings.
If you have a different backing storage type, you can write your own subclasses of the corresponding abstract classes: NSTextContentManager and NSTextElement.
Ok, that was the text storage layer. Continuing the example, I'll look at layout next.
After the text content storage breaks the attributed string into paragraphs, the NSTextLayoutManager does the work to prepare the paragraphs for rendering. The text layout manager performantly measures the metrics of the glyphs that make up the represented text, and dynamically creates an NSTextLayoutFragment that stores the calculated layout information of the paragraph.
These objects are immutable. Which means, if a paragraph is edited, the NSTextParagraph and NSTextLayoutFragment are recreated. For example, if I replace the word sandwich with slider a new NSTextParagraph is created for that paragraph, and a corresponding new NSTextLayoutFragment is created with new layout information.
Next I'll show you how the top two layers, the viewport and the view, work together to efficiently render huge amounts of text.
The text view is a dynamically sized view that can grow as text is laid out and drawn into it, and shrink as text is removed. The viewport is the part of the text view that is visible to the user. TextKit organizes all of its work around the viewport only rendering text that the user can see. This means that one of your core tasks when working with TextKit is enhancing the user's interaction based on the layout information that the viewport provides. To facilitate the rendering of layout fragments onto the text view, TextKit provides a dedicated class: NSTextViewportLayoutController.
The NSTextViewportLayoutController, I'll just call it the viewport controller.
The viewport controller coordinates with the text layout manager, and the text view to efficiently layout and render paragraphs of text. Let me show you how.
The text view knows the scroll position and size of the viewport with respect to the whole document, and provides this to the viewport controller.
The viewport controller then requests the text layout manager to provide all of the layout fragments that intersect with the viewport, and sends them to the text view for rendering. This coordination, facilitated by the viewport controller, repeats on any change of viewport state. That is, any scroll, edit, or selection event, and is called the viewport layout process.
The viewport layout process is central to TextKit's performant layout and rendering. And that's it! To build your own custom text view, instantiate an NSTextContentStorage, NSTextLayoutManager, and render the text using an NSTextViewportLayoutController into it's delegate, a view provided by the UI Framework.
Even though I refer to the text view as a view, this could be any drawable visual element that the UI Framework provides. For example, in UIKit, you can choose a UIView or a CALayer to render text into a custom text view. UI Frameworks also package its own type of text view for your convenience with these TextKit layers.
In UIKit, you can use UITextView to implement an off-the-shelf text editing experience. AppKit and SwiftUI have similar views.
Occasionally, a framework text view might not meet the needs of your app. Perhaps you're building an app that has multiple presentations of the same text.
Connect multiple text layout managers to the same text content storage, and edits in one view will propagate through the shared content storage to the other.
This means you can present the same document in two different views and they stay in sync automatically.
With the flexibility that TextKit provides, you can build custom text views with a layering configuration that's right for your scenario. Now, let's take a look at some of the new APIs that we are introducing in TextKit. In the previous section, we talked about rendering text from a layout fragment onto the viewport. That's the viewport layout process. And before the 2027 releases, we did not have a way of referring to the destination views where the text is rendered across TextKit. This meant that while TextKit helped you keep track of layout fragments, it did not help you keep track of the views that they were drawn in.
First, meet NSTextViewportRenderingSurface.
This is a new protocol that represents a visual element inside the viewport that you can draw into. The view that actually renders a layout fragment's text and provides a common abstraction to work with. You can conform your UIView, NSView or CALayer to this protocol, and use it in the viewport controller's delegate methods to keep track of what views are visible in the viewport.
The rendering surface comes with a companion key protocol NSTextViewportRenderingSurfaceKey. A rendering surface key is any class that can uniquely identify a rendering surface across viewport layout process cycles, like NSTextLayoutFragment.
This means you can use NSTextLayoutFragment as a key to cache rendering surfaces in map tables or dictionaries.
The viewport layout process extensively uses the rendering surface key to rendering surface mapping internally.
You can assign a rendering surface to a key during the viewport layout process by using the renderingSurfaceFor delegate method.
These are cleared at the beginning of the viewport layout process.
You can query the rendering surface for a particular key within the didLayout process using the viewport controller's renderingSurfaceFor method.
These new APIs empower you to use and customize your own rendering surfaces when building custom text views using TextKit.
Now that we've seen how TextKit works in our 2027 releases, let's look at how the text views that power apple's default text experiences work. UIKit's UITextView and AppKit's NSTextView power thousands of long-form text experiences on Apple's platforms, including Messages, TextEdit, Notes, and Journal.
If you have a SwiftUI app, the most convenient way to implement a long-form text experience is using TextEditor. But you could also include a UITextView or NSTextView in your app by using a ViewRepresentable.
Let me show you.
To start, I'll create a view called MyTextView.
I will populate MyTextView's body with a ViewRepresentable, that I'll call, TextViewRepresentable.
TextViewRepresentable will conditionally be an NSViewRepresentable on macOS and a UIViewRepresentable otherwise.
Inside the NSViewRepresentable, you simply call the initializer for your NSTextView, or your NSTextView subclass in the makeNSView method.
And do the same for UITextView inside the UIViewRepresentable. You can see specific examples of this in the accompanying sample app.
In order to show you how you can extend UITextView using its Textkit hooks, I'll be creating a few different example apps.
In my first example, I want to build a code editor for my iPad so that I can write some quick code while I'm away from my Mac.
I'll start with a UITextView subclass, initialize it and set it's font to the monospaced system font.
Ok, that's a start! But, this isn't really a great code editor experience if I can't see line numbers. Let's start building that.
First, let's create a view that can hold a TextView and a lineNumberView. We'll call this ContainerView.
The ContainerView will hold on to our UITextView subclass, and a UIView to display the line numbers.
I have a basic setup, so what I want now is to recompute and show the NSTextParagraph index for the layout fragments in the viewport, whenever there is a change in the viewport. And in order to do that, I need the text view to be notified whenever its viewport controller has gone through a viewport layout process.
And that's possible now! Starting with our 2027 releases, UITextView and NSTextView now conform to NSTextViewportLayoutControllerDelegate.
This means you can subclass UITextView or NSTextView and override the delegate methods to add your own behavior. I'll do that next! In my TextView subclass, I'll override the delegate methods.
First, I'll override the WillLayout method to do some setup work. I'll show the details in a bit. I'll override the configureRenderingSurface method to capture the bounds of the paragraphs to be rendered. Finally, I'll override the DidLayout method to share the accumulated info back to the ContainerView so it can render the line numbers.
Before showing these methods, I'll add some state to my subclass. I'll start with an array to accumulate the bounds of each paragraph the text view lays out, an integer to track the starting line number, and a closure that I'll use to send the accumulated info up to my ContainerView, so it can render the line numbers.
The viewport controller delegate methods help the text view know when scrolling or editing has happened, so that we can redraw the line numbers.
I'll implement the methods next, starting with WillLayout. I'll start by calling super. Remember to do that in all of these delegate methods.
I'll clear out the lines variable so that we can get ready to store the bounds of the layout fragments. We also need the starting LineNumber, that's basically a count of all the paragraphs before the viewport starts.
Let me do that in its own function and call it from within the WillLayout method.
I'll start with some simple nil checks and variable naming. I'll use the enumerateTextElements from text location method to enumerate the elements and increment my count until we reach the viewportRange. And that's it! The sample code improves this with caching, so you don't pay this cost on every layout pass. Let's go back to our delegate methods. and see how we can get the bounds for each paragraph.
We'll do that using the next delegate method, configureRenderingSurfaceFor: textLayoutFragment.
I'll start again by calling super, so that I get the default text view behavior and then append the lines array with the layout fragment's layoutFragmentFrame variable. That's it for the configureRenderingSurfaceFor textLayoutFragment method. This method will be triggered for every paragraph in the viewport.
Let's look at the DidLayout method. At this point, I have the bounds information of every paragraph in the viewport, and I want to pass it to the ContainerView.
Before firing the closure, I need to convert the fragment frames from text container coordinates to viewport coordinates.
I do that by subtracting the viewport origin. Then, I pass the starting line number and the adjusted frames to the ContainerView. Back in the ContainerView, I set the closure. For each frame, I calculate the actual line number by adding the index to the starting line number, and draw it at the right position in the LineNumber view. And that's it. We set up the variables, collect the bounds for each paragraph in the text view, and pass it to the ContainerView to display it. Let's run the app and see how we did.
Perfect, we added line numbers to a UITextView with just a few lines of code.
I have more work to do but this is a great first step to building a code editor.
Using the framework text view's viewport layout process is a powerful way to access and display individual paragraph information.
Let me show you one more example. This time involving modifying layout for multiple paragraphs.
Here I've set up a UITextView to show some of my favorite recipes. But I really want to see them one recipe at a time. That is, I want to collapse each multi-paragraph recipe into just its heading.
To do this, I'll start with the same three viewport delegate methods from the last example. But on top of this, if a paragraph is collapsed, I want to avoid doing layout on it.
To do that, I'll conform the TextView to NSTextContentStorageDelegate.
Through this conformance, I'll get access to textContentManager: shouldEnumerate, which will help me mark textElements as collapsed or not. Remember, NSTextContentManager is just the abstract version of NSTextContentStorage, and NSTextElement is the abstract version of NSTextParagraph.
We want some state to hold on to which sections are collapsed.
We'll use a set of ints to keep track of the paragraph offset to uniquely identify each paragraph.
Additionally, we add a method to handle when the user taps on a toggle button.
These are all the pieces you need! Skip layout using the text content storage delegate method, process every paragraph that does layout in the viewport using the viewport controller delegate methods, and handle the user interaction for when the user taps on a section's disclosure button.
You can take a look at the sample code for the details. Let's look at what that accomplished.
I can collapse any recipe into just the heading by tapping on the triangle next to it, and I did it right in UITextView. Ok, let's take a step back.
So far, our examples have been about text, paragraphs, line numbers, and section headings. But text views display much more than just text. Think about Messages with inline photos and stickers. Or Notes, with drawings and document scans.
All of that non-text content lives inside the text view, managed by TextKit. These are called text attachments. Text attachments follow the same architecture as regular text. Let me focus on one paragraph, and represent an attachment using the paperclip symbol to make things simple. A text attachment is stored in the text storage just like any other character, and is done using a NSTextAttachment object.
When the layout manager encounters a text attachment, it asks for an NSTextAttachmentViewProvider, that's the corresponding object in the layout layer. The view provider provides the necessary information to render the attachment onto the text view. This brings us to a challenge. Since these objects are immutable, if we were to edit the text in the paragraph all instances would have to be discarded and recreated. Let me show you a concrete example.
Say I'm building a messaging app with inline animations. Watch carefully as I edit. The animation restarts on every edit for the corresponding paragraph. My view provider is recreated on every edit and that restarts the animation.
To solve this, we've added a new API on UITextView.
Once I initialize my text view, I use the register forTextAttachmentViewProviderType method to register a view provider reuse policy for a particular subclass of NSTextAttachmentViewProvider. For the first argument, I add the onEditingInlineParagraphs reuse policy.
This preserves the view provider across paragraph edits, so keystrokes don't tear down my view provider.
For the second argument, I provide the view provider subclass type, and the text view will take care of all objects of that particular class. In the sample code, you can see a second type of reuse policy: onScrollingOutOfViewport. This caches the attachment's rendering surface when it scrolls off screen and restores it when it comes back. You can combine both reuse policies depending on your scenario.
Now, on editing, UITextView reuses the view provider, maintaining state, and avoiding any animation glitches.
So there you go! Three examples of using TextKit in UITextView, line numbers for a text editor, collapsible sections in a recipe app, and inline text attachment reuse in a simple text view. You can download the sample app to look at the details.
To recap, to create a convenient but powerful rich text editor experience, kickstart your app with UITextView on UIKit and NSTextVIew on AppKit. If you have a SwiftUI app, use a ViewRepresentable to include these text views in your app. For those of you who want much more control over your text rendering, create custom text views using TextKit and use the new Rendering Surface APIs.
Check out the sample code to see collapsible sections, line numbers, and inline attachment reuse in action. Thanks for watching!
-
-
9:47 - NSTextViewportRenderingSurface conformance
class MyView: UIView, NSTextViewportRenderingSurface {} -
10:25 - NSTextViewportRenderingSurfaceKey and NSMapTable
class MyView: UIView, NSTextViewportRenderingSurface {} var cache: NSMapTable<NSTextLayoutFragment, MyView> -
12:39 - UITextView/NSTextView in SwiftUI via ViewRepresentable
// Using a TextView in SwiftUI import SwiftUI struct MyTextView: View { var body: some View { TextViewRepresentable() } } #if os(macOS) struct TextViewRepresentable: NSViewRepresentable { func makeNSView(context: Context) -> NSTextView { NSTextView() } func updateNSView(_ nsView: NSTextView, context: Context) { } } #else struct TextViewRepresentable: UIViewRepresentable { func makeUIView(context: Context) -> UITextView { UITextView() } func updateUIView(_ uiView: UITextView, context: Context) { } } #endif -
13:33 - ContainerView with TextView and line number view
// Create a text view subclass for a code editor import UIKit class TextView: UITextView {} class ContainerView: UIView { let textView = TextView() let lineNumberView = UIView() textView.font = UIFont.monospacedSystemFont } -
14:42 - Three NSTextViewportLayoutControllerDelegate overrides
// Override viewport controller delegate methods class TextView: UITextView { // Set up override func textViewportLayoutControllerWillLayout(_ textViewportLayoutController: NSTextViewportLayoutController) { super.textViewportLayoutControllerWillLayout(textViewportLayoutController) //... } // Get paragraph bounds override func textViewportLayoutController (_ textViewportLayoutController: NSTextViewportLayoutController, configureRenderingSurfaceFor textLayoutFragment: NSTextLayoutFragment) { super.textViewportLayoutController(textViewportLayoutController, configureRenderingSurfaceFor: textLayoutFragment) //... } // Share accumulated info back to ContainerView override func textViewportLayoutControllerDidLayout (_ textViewportLayoutController: NSTextViewportLayoutController) { super.textViewportLayoutControllerDidLayout(textViewportLayoutController) //... } } -
15:59 - startingLineNumber(for:) using enumerateTextElements
func startingLineNumber(for viewportRange: NSTextRange?) -> Int { guard let viewportRange, let storage = textLayoutManager?.textContentManager as? NSTextContentStorage else { return 0 } let startLocation = storage.documentRange.location var count = 1 storage.enumerateTextElements(from: startLocation) { element in guard let range = element.elementRange else { return true } if range.location.compare(viewportRange.location) != .orderedAscending { return false } count += 1 return true } return count } -
17:02 - DidLayout: convert frames to viewport coordinates
// Override viewport controller delegate methods class TextView: UITextView { private var lines: [CGRect] = [] private var startingLineNumber = 0 var onDidLayout: ((Int, [CGRect]) -> Void)? // Share accumulated info back to ContainerView override func textViewportLayoutControllerDidLayout (_ textViewportLayoutController: NSTextViewportLayoutController) { super.textViewportLayoutControllerDidLayout(controller) let origin = controller.viewportBounds.origin onDidLayout?(startingLineNumber, lines.map {$0.offsetBy(dx: 0, dy: -origin.y) }) } } -
17:16 - Draw line numbers in ContainerView closure
// Draw line numbers in the ContainerView class ContainerView: UIView { let textView = TextView() let lineNumberView = UIView() func setup() { textView.onDidLayout = {startingLineNumber, lines in let attributes: [NSAttributedString.Key: Any] = [ .font: UIFont.monospacedSystemFont(ofSize: 11, weight: .regular), .foregroundColor: UIColor.secondaryLabel ] for (i, frame) in lines.enumerated() { let number = "\(startingLineNumber + i)" as NSString number.draw(at: CGPoint(x: 8, y: frame.minY), withAttributes: attributes) } } } } -
19:22 - Collapsible sections: full TextView class
// Add collapsible sections to your text view class TextView: UITextView, NSTextContentStorageDelegate { var collapsedSections: Set<Int> = [] // Set up override func textViewportLayoutControllerWillLayout(_ textViewportLayoutController: NSTextViewportLayoutController) { super.textViewportLayoutControllerWillLayout(textViewportLayoutController) //... } // Get paragraph bounds override func textViewportLayoutController (_ textViewportLayoutController: NSTextViewportLayoutController, configureRenderingSurfaceFor textLayoutFragment: NSTextLayoutFragment) { super.textViewportLayoutController(textViewportLayoutController, configureRenderingSurfaceFor: textLayoutFragment) //... } // Share accumulated info back to ContainerView override func textViewportLayoutControllerDidLayout (_ textViewportLayoutController: NSTextViewportLayoutController) { super.textViewportLayoutControllerDidLayout(textViewportLayoutController) //... } // Skip layout for paragraphs marked as collapsed func textContentManager(shouldEnumerate textElement: NSTextElement, options: NSTextContentManager.EnumerationOptions) -> Bool { //... } // Handle section collapse toggling func toggleSection(headerOffset: Int) { if collapsedSections.contains(headerOffset) { collapsedSections.remove(headerOffset) } else { collapsedSections.insert(headerOffset) } guard let textLayoutManager = textLayoutManager else { return } let textViewportLayoutController = textLayoutManager.textViewportLayoutController textViewportLayoutController.delegate?.textViewportLayoutControllerReceivedSetNeedsLayout?(textViewportLayoutController) } } -
22:06 - Text attachment view provider reuse policy
// Cache text attachment view providers

import UIKit

class ViewController: UIViewController {

    var textView: UITextView

    func setupTextView() {
        textView = UITextView()
        textView.register(
            [.onEditingInlineParagraphs],
            forTextAttachmentViewProviderType: AnimatedAttachmentViewProvider.self
        )
    }
}
-
-
- 0:00 - Introduction
TextKit and the tension between using framework text views versus building custom ones. TextKit is Apple's text engine powering text controls in SwiftUI, UIKit, and AppKit.
- 3:09 - TextKit architecture
Walk through TextKit's four-layer architecture: text storage, layout, viewport, and view. See how NSTextContentStorage breaks an attributed string into NSTextParagraph elements, how NSTextLayoutManager produces immutable NSTextLayoutFragments, and how NSTextViewportLayoutController coordinates with the text view to efficiently render only the paragraphs visible in the viewport.
- 9:17 - What's new in TextKit
Meet the new NSTextViewportRenderingSurface protocol — a common abstraction for views or layers that draw layout fragments — and NSTextViewportRenderingSurfaceKey, which uniquely identifies surfaces across viewport layout cycles Use the new delegate methods to assign and query rendering surfaces during the viewport layout process.
- 11:27 - Extending framework text views
UITextView and NSTextView now publicly conform to NSTextViewportLayoutControllerDelegate, so you can subclass and override willLayout, configureRenderingSurface, and didLayout to extend their behavior. Use a SwiftUI ViewRepresentable to bring these text views into a SwiftUI app.
- 12:58 - Example: Code editor with line numbers
Build a code-editor experience by subclassing UITextView and overriding the viewport controller delegate methods. Calculate the starting line number with enumerateTextElements, capture each layout fragment's bounds in configureRenderingSurface, and pass the results to a container view that draws line numbers alongside the text.
- 17:52 - Example: Collapsible recipe sections
Modify layout for multiple paragraphs by conforming to NSTextContentStorageDelegate. Use textContentManager(_:shouldEnumerate:) to skip layout for collapsed paragraphs, track collapsed paragraph offsets in state, and toggle them in response to user taps — collapsing each multi-paragraph recipe down to just its heading.
- 19:56 - Text attachments and view provider reuse
Text attachments use the same TextKit architecture as regular text, with NSTextAttachmentViewProvider supplying the view. New in 2027: register a reuse policy with UITextView using register(_:forTextAttachmentViewProviderType:). Use onEditingInlineParagraphs to preserve view providers across edits and onScrollingOutOfViewport to cache surfaces when they scroll off screen.
- 23:00 - Next steps
Kickstart your app with UITextView, NSTextView, or TextEditor; extend them via the viewport controller delegate hooks; or use TextKit directly to build fully custom rendering. Download the sample app to explore each example.