-
「連絡先へのアクセス」ボタンについて
連絡先へのアクセス許可の新しいモードについて説明し、アプリで連絡先へのアクセスを向上させる方法をご紹介します。「連絡先へのアクセス」ボタンをアプリに追加し、必要に応じて新しい連絡先を共有したり、連絡先へのアクセス許可を簡単に行えるようにしたりする方法を説明します。このボタンがアプリに適していない場合に使用する代わりのAPIや、連絡先のセキュリティ機能についても取り上げます。
関連する章
- 0:00 - Introduction
- 0:36 - Limited Access
- 2:56 - Contact Access Button
- 8:28 - Accessing contacts
- 13:34 - Which access method to use
リソース
-
このビデオを検索
こんにちはAdaです このセッションでは 「連絡先へのアクセス」ボタンを簡単に紹介し アプリでの使い方も説明します まず iOS 18で利用できる 限定アクセス機能の 概要を説明します 次に 新しいContactAccessButton APIについて 説明し このAPIによってアプリから 連絡先を直接操作する便利な方法を 紹介します 最後に 連絡先にアクセスするための 別の方法と それが アクセスの制限された状態で どう機能するかを説明します
iOS 18では 連絡先へのアクセスを許可する際 連絡先データベースの一部だけを 共有するオプションが追加されました これを限定アクセスと呼びます 連絡先への新しいアクセス許可は 2段階のプロンプトで行われます 最初のアラートで 連絡先をアプリと 共有するかどうかが尋ねられます をタップすると 2つ目のプロンプトが表示され 連絡先の共有に関する 2つのオプションが提示されます ここでは共有する連絡先のセットを選択するか またはアプリですべてのアクセスを 許可するかを選択できます プロンプトでは これが最終的な選択ではないことと 連絡先のセットは後から 拡張できることが明示されます
目的の連絡先セットを選択すると 選択した連絡先が確認画面に表示されます この新しいアクセス許可フローによって 連絡先のプライバシーが大幅に改善され 透明性が高まり 共有内容の管理性も向上します
この新機能には 4つの許可レベルがあります フルアクセスの場合 アプリはすべての連絡先を読み取ることができ 連絡先の変更や新規作成も行えます
限定アクセスの場合 アプリは アクセスを許可された 連絡先だけを読み取ることができます また フルアクセスの場合と同様に 連絡先の変更や新規作成も行えます
アプリは常に 許可ステータスがの状態で 起動します 連絡先ストアにアクセスしようとすると 許可プロンプトが モーダル形式で表示されます
アプリがアクセスを許可されていれば アクセスは成功します
最後に アプリの許可レベルがの場合は 連絡先データの読み書きができません
アクセスが制限された状態でも 素晴らしい体験が得られるように iOS 18には 追加の連絡先へのアクセスを アプリに許可するための 2つの新しいAPIが用意されています 連絡先アクセスピッカーを使用すると アプリがどの連絡先にアクセスできるかを アプリを離れることなく 簡単に変更できます
連絡先アクセスボタンは アプリ内で連絡先へのアクセスを管理できる パワフルな新しい方法です 全画面表示のピッカーの代わりに このボタンを既存のUIに組み込めば 新しい連絡先へのアクセスを シングルタップで許可できます ここまでで 連絡先への基本的な アクセス方法を紹介しましたので 次に 限定アクセスを利用する最良の方法である 連絡先アクセスボタンについて 詳しく見ていきましょう ContactAccessButtonは 追加の連絡先へのアクセスを アプリに許可するための合理的な方法です
このボタンを アプリの連絡先検索フローに追加すると アプリがまだ アクセスを許可されていない連絡先の 検索結果が表示されます ボタンは アプリにシームレスに 組み込まれるように設計されています
一意に一致する連絡先があれば ボタンを1回タップするだけで その連絡先へのアクセスがアプリに許可されます これを使用すれば フルアクセス許可がなくても 完全な連絡先ピッカー機能を アプリ内で体験できます
限定アクセスに対する こうした段階的なアプローチは 必要な時に必要な連絡先に アプリが確実に アクセスできることを意味します その結果 アプリでの連絡先の共有を 安心して行えるようになります
アクセス許可を求める最良のタイミングは インタラクションのため アクセスが必要になった瞬間です データが必要になった時点で 要求が行われれば アクセスが許可された場合 アプリがどのような機能を提供するのかが 明確になります
連絡先アクセスボタンは この原則に基づいて設計された機能です この機能を使用する場合は 個々の連絡先を共有する 明確な必要性がある時に アクセスを求めるワークフローに従って アプリを方向付けることになります
ユーザーはこのボタンを使用すると どの連絡先を共有したいかを 正確に理解している状況で 決定を行えるため アプリでどの連絡先が必要になるかを 推測する必要がありません
連絡先アクセスボタンは このアイデアをさらに発展させたもので アプリの許可レベルがまだ未決定の状態でも ボタンを表示できるのです
アプリがアクセスを許可される前に ユーザーがボタンをタップすると 限定アクセスを要求する簡易プロンプトが 自動的に表示されます この動作は 連絡先の検索結果を タップした直後に行われるため アプリがなぜアクセスを必要としているのか わかりやすく アプリがアクセスを許可される可能性が 高くなります
アプリ内でボタンを使用する例を 見てみましょう これはアプリで連絡先の検索結果を表示する 単純なビューです
このビューはアプリの 検索テキストフィールドに入力された テキストとのバインディングを持ち
アプリの許可ステータスを追跡しています
最初に アプリが自身のデータストアから 取得できる結果を表示してみます 今回は 単純なForEachを使用して これを行います
アプリ自身の結果を得た後 条件付きで つまりアプリの許可ステータスが 「limited」または 「notDetermined」の場合にのみ 連絡先アクセスボタンを表示してみます
ボタンを初期化する際は 検索フィールドに入力されたテキストを渡します
最後に コールバックブロックで 連絡先のID文字列の配列を受け取ります この時点で 連絡先の詳細を取得できるため 検索UIを消去できます
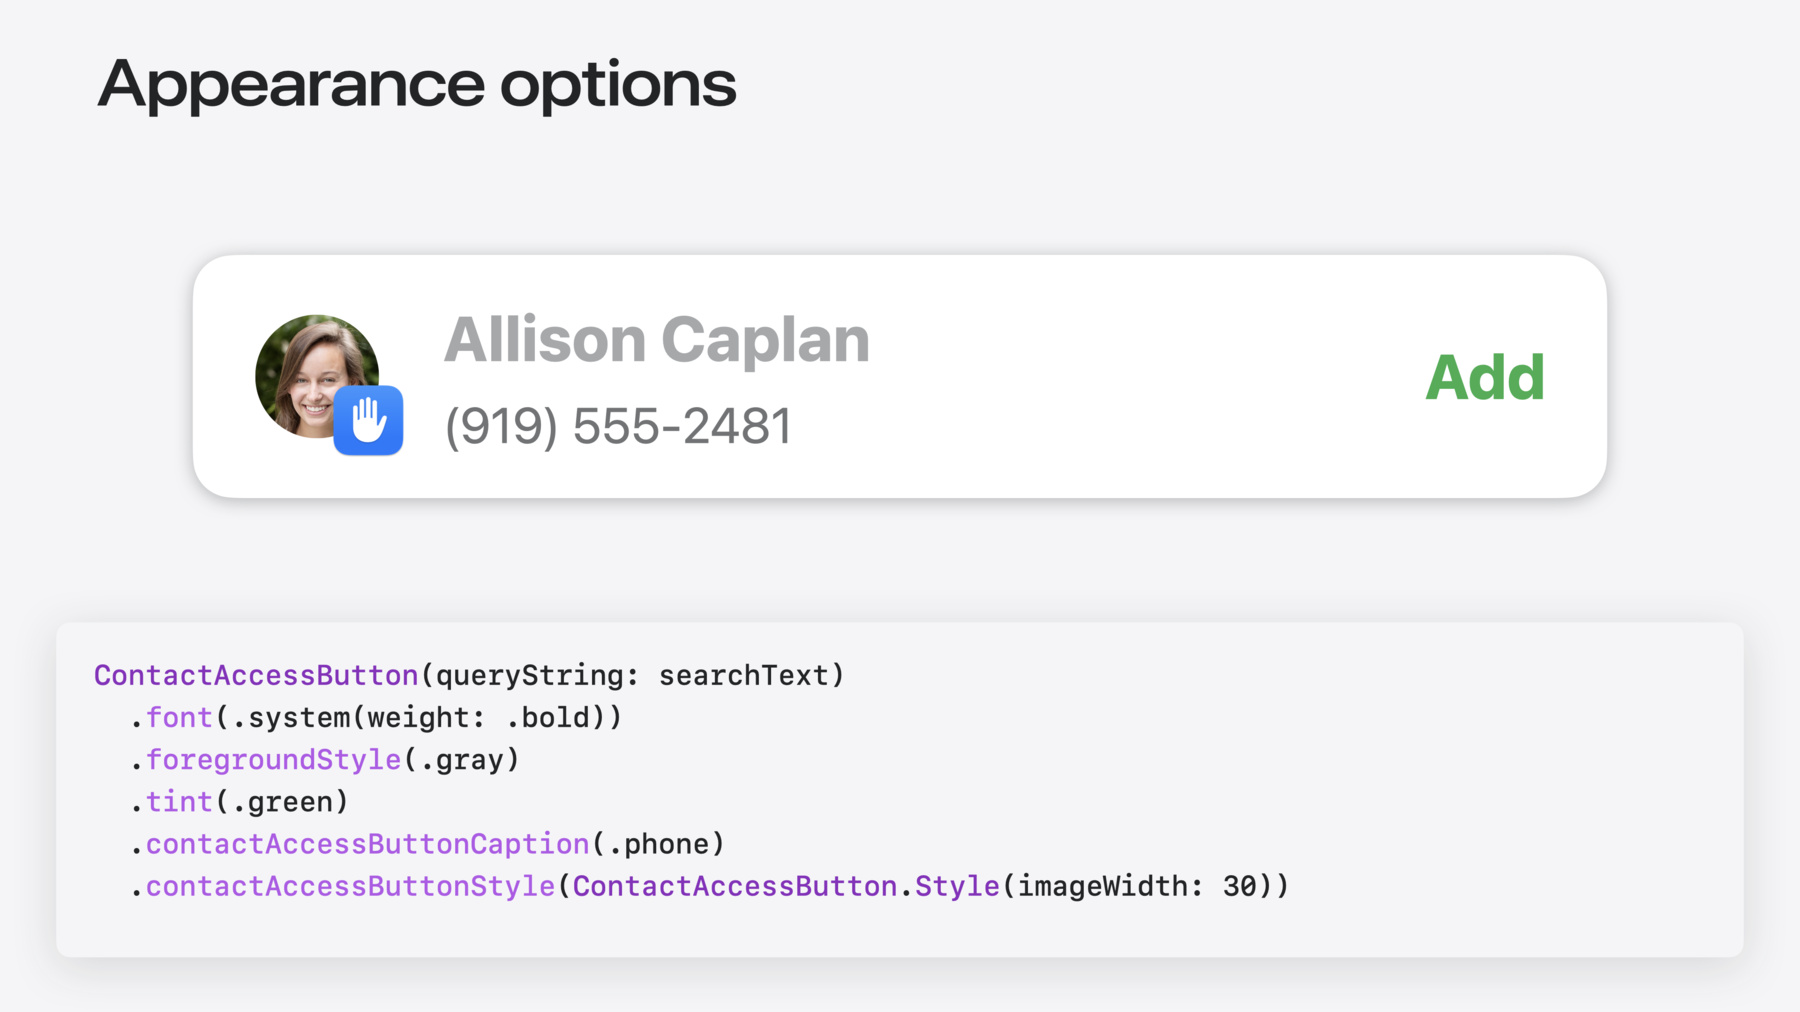
ボタンは標準のSwiftUIモディファイアを 使用すれば アプリの外観に合わせて 調整できるように設計されています
fontモディファイアは 上行のテキストと 末尾のアクションラベルの 外観を制御します
foregroundStyleモディファイアは メインテキストの色を変更します
アクションラベルには アプリの色遣いが使用されます
最後に ボタン固有のモディファイアを いくつか紹介します 一致する連絡先が1つだけの場合は その連絡先の情報の一部を ボタンに表示できます これはcontactAccessButtonCaption モディファイアで指定できます
contactAccessButtonStyleモディファイアを 使用すると 連絡先の写真サイズをカスタマイズできます
連絡先ボタンは アプリが 堅牢なプライバシー保護のもとで 追加のアクセス許可を得るための 強力かつ便利な方法です ボタンには アプリがアクセスを許可される前は 機密情報が表示されているため その内容は非公開にされていますが ボタン自体はアプリに表示されます
さらにボタンは 検証済みのイベントにのみ反応します
最後に ボタンがタップされた時に アクセスが許可されるのは その内容がはっきりと読み取り可能で 隠されていない場合のみです そのため ボタンをタップすると 何が起こるのかは常に明確です
ボタンは判読可能でなければならず 隠されていてはなりません そうでないと 追加の連絡先へのアクセスが アプリに許可されません
まず最初に 前面要素と背景のコントラストが高く レンダリングに十分なスペースがあり ボタン全体が表示されるように構成された ボタンの例を示します これはボタンの可読性に関する すべての要件を満たしています その下は 不適切に設定されたボタンの例です テキストと背景のコントラスト比が非常に低く 白い背景に薄いグレーの文字を使用しています
また ボタンの一部が切り取られて 見えなくなっています
このボタンをタップしても 連絡先へのアクセスは許可されません
連絡先アクセスボタンは判読可能で 隠されておらず レンダリングに十分なスペースがあることを 常に確認してください
Contactsフレームワークには このボタンの他に 連絡先データに アクセスする方法が3つあります それぞれの仕組みと 限定アクセスを使用する意味について 説明します
CNContactStoreは 連絡先データに アクセスするための主要な方法です これを使用すると 連絡先を取得して 新しい連絡先エントリを作成できます
アプリが連絡先データに アクセスしようとすると CNContactStoreは 自動的に許可プロンプトを表示します
CNContactStoreを使用して アプリの現在の許可レベルを確認し そのレベルに応じて 適切なUIを表示してください
連絡先データの読み書きが成功するのは アプリがアクセスを 許可されている場合のみです
CNContactStoreは連絡先データが 変更されると通知もするほか その変更内容の確認にも使用できます
アクセスが制限されている場合 連絡先ストアは アプリと共有されている 連絡先エントリを提供します 許可状態が 新しい .limited列挙型ケースかどうかを調べることで フルアクセスと部分的なアクセスの どちらが許可されたかを判断できます .limitedステータスは どのUIを表示するかを 決定するために用意されています これは ContactAccessButtonのような 限定的な許可のために設計された 新しい連絡先APIを 選択的に使用する場合に便利です
最後に CNContactStoreは ContactAccessButtonを使用するために 不可欠な部分であり 連絡先IDの配列を返します CNContactStoreでこれらのIDを使用すると 必要な連絡先データを取得できます どのように動作するのか 例を示します
これは 連絡先ID文字列の配列を受け取り 各IDが表すCNContactsを返す関数です メインアクターがブロックされるのを避けるため 待機しているタスク内で フェッチ処理を実行します
このタスク内で まずCNContactFetchRequestを作成し フェッチしたい連絡先フィールドのキーを リストアップします この例では 連絡先名を表示するために必要な フィールドのみを取得します
ここではIDに基づいて 連絡先を取得するために CNContact.predicateForContacts (withIdentifiers:)を使用します
その後 CNContactStoreの enumerateContacts(with:)を使用して 収集した結果を配列に格納します 連絡先データにアクセスするもう一つの方法は CNContactPickerViewControllerの使用です このビューコントローラは 連絡先データベースから 1つ以上の連絡先を選択するための システムUIを表示します
連絡先が選択されると 選択された連絡先のスナップショットが アプリに1回だけ送られます このビューコントローラは アプリの許可レベルに関係なく動作し 常に連絡先データベース全体を表示します
ピッカーで1つ以上の連絡先が選択されると ユーザーとのやり取りの中で 暗黙の許可が与えられ アプリは連絡先データを受け取ります
CNContactPickerViewControllerは 連絡先情報が 単発のタスクに必要なだけの場合に最適です 例えば Eメールアドレスや 電話番号を選択するなど 連絡先が1回限り アプリに共有される場合です
iOS 18には新しいピッカー contactAccessPickerがあります これによって表示されるモーダルシートでは アプリがアクセスを制限されている 連絡先セットを変更できます これは一括操作や 即時性のないユースケースで 追加の連絡先に アクセスする場合に使用します 例えばソーシャルアプリでは 友達をマッチングさせる目的で 追加の連絡先を共有する機能が 必要になる場合があります
contactAccessPickerは 新たにアクセスを 許可された連絡先のIDを返します
CNContactPickerViewControllerと 異なる点はここです contactAccessPickerはアプリがアクセス可能な 連絡先を CNContactStoreを介して 管理するための機能です CNContactPickerViewControllerは 連絡先データの 1回限りのスナップショットへの アクセスを提供します
その使い方の例を紹介します この例では Stateブール値を切り替える 単純なボタンを使用します ここで contactAccessPickerメソッドを使用して ブール値がtrueの場合は ボタンにピッカーを表示させます
最後に コールバックブロックで アプリにアクセスが許可されたばかりの 連絡先を取得します
ContactAccessButtonと同様 このコールバックブロックは 連絡先ID文字列の配列を受け取るので 連絡先の取得方法はまったく同じです ただしこの方法では 新たに アクセス可能となった連絡先だけが報告されます 私が説明したすべての例は この動画に関連付けられた サンプルアプリで利用できます 各APIの使用法を説明した コメントも確認できます
連絡先にアクセスする方法は4種類あり 許可レベルによって それぞれ影響が異なります 使い分けをまとめてみましょう
CNContactPickerViewControllerは どの許可レベルでも動作し 常に ビューコントローラで選択された 連絡先への 1回限りのアクセスを 可能にします CNContactStoreは 連絡先データへの主要なゲートウェイであり アクセス許可を必要とします まれに アプリの許可状態が「Full」である場合 そのアプリは あらゆる連絡先データを読み書きできます アプリが限定的に アクセスを許可されている場合は 許可された連絡先セットにしか アクセスできません
アプリの許可状態が「Not determined」の場合は CNContactStoreのクエリ時に 許可プロンプトが表示されます
アプリがアクセスを拒否された場合 連絡先データにはアクセスできません ContactAccessButtonは アプリが 限定的にアクセスを許可されている時に 追加の連絡先にアクセスするための機能です タップすると CNContactStoreを使用して 連絡先が取得されます このボタンは アプリが許可を受ける前に 使用することもできます UIとして ContactAccessButtonを使用すると アプリが限定的にアクセスを許可されている 場合でも 最適な体験が得られます
contactAccessPickerは アプリの 限定的アクセスを管理する機能なので 限定アクセスを許可されている場合にのみ 使用してください
これで 連絡先の許可レベルとアクセス方法が すべてわかったことになります
次のステップとして iOS18でアプリを実行し アクセスを制限して動作をテストします ContactAccessButtonを使用すると 必要な時にすぐに アプリのUIから連絡先へのアクセスを 直接管理できます
連絡先情報を共有するために アプリにとって どの連絡先アクセス方法が最適かを 検討してください
ご視聴ありがとうございました
-
-
5:15 - Using ContactAccessButton
// Using ContactAccessButton @Binding var searchText: String @State var authorizationStatus: CNAuthorizationStatus = .notDetermined var body: some View { List { ForEach(searchResults(for: searchText)) { person in ResultRow(person) } if authorizationStatus == .limited || authorizationStatus == .notDetermined { ContactAccessButton(queryString: searchText) { identifiers in let contacts = await fetchContacts(withIdentifiers: identifiers) dismissSearch(withResult: contacts) } } } } -
6:10 - Appearance options
ContactAccessButton(queryString: searchText) .font(.system(weight: .bold)) .foregroundStyle(.gray) .tint(.green) .contactAccessButtonCaption(.phone) .contactAccessButtonStyle(ContactAccessButton.Style(imageWidth: 30)) -
10:11 - Fetching contacts with CNContactStore
// Fetching contacts with CNContactStore func fetchContacts(withIdentifiers identifiers: [String]) async -> [CNContact] { return await Task { let keys = [CNContactFormatter.descriptorForRequiredKeys(for: .fullName)] let fetchRequest = CNContactFetchRequest(keysToFetch: keys) fetchRequest.predicate = CNContact.predicateForContacts(withIdentifiers: identifiers) var contacts: [CNContact] = [] do { try CNContactStore().enumerateContacts(with: fetchRequest) { contact, _ in contacts.append(contact) } } catch { // ... } return contacts }.value } -
12:47 - Using contactAccessPicker
// Using contactAccessPicker

@State private var isPresented = false

var body: some View {
    Button("Show picker") {
        isPresented.toggle()
    }.contactAccessPicker(isPresented: $isPresented) { identifiers in
        let contacts = await fetchContacts(withIdentifiers: identifiers)
        // use the new contacts!
    }
}
-