-
AlarmKit APIによるアラーム
おっと、時間です!iOSおよびiPadOS26のAlarmKitフレームワークを利用すると、レシピアプリのカウントダウンタイマーや旅行計画アプリの目覚ましアラームなどで、ロック画面、Dynamic Island、その他の場所にタイマーとアラームを追加できます。AlarmKitフレームワークを使用して、アプリのアラームの作成および管理、ライブアクティビティのカスタマイズ、カスタムのアラートアクションの実装方法を学びましょう。このビデオの内容を十分理解できるよう、まずWWDC23の「Meet ActivityKit」を視聴することをおすすめします。
関連する章
リソース
- Scheduling an alarm with AlarmKit
- AlarmKit
- Creating your first app intent
- Human Interface Guidelines: Live Activities
- ActivityKit
- App Intents
関連ビデオ
WWDC25
WWDC23
-
このビデオを検索
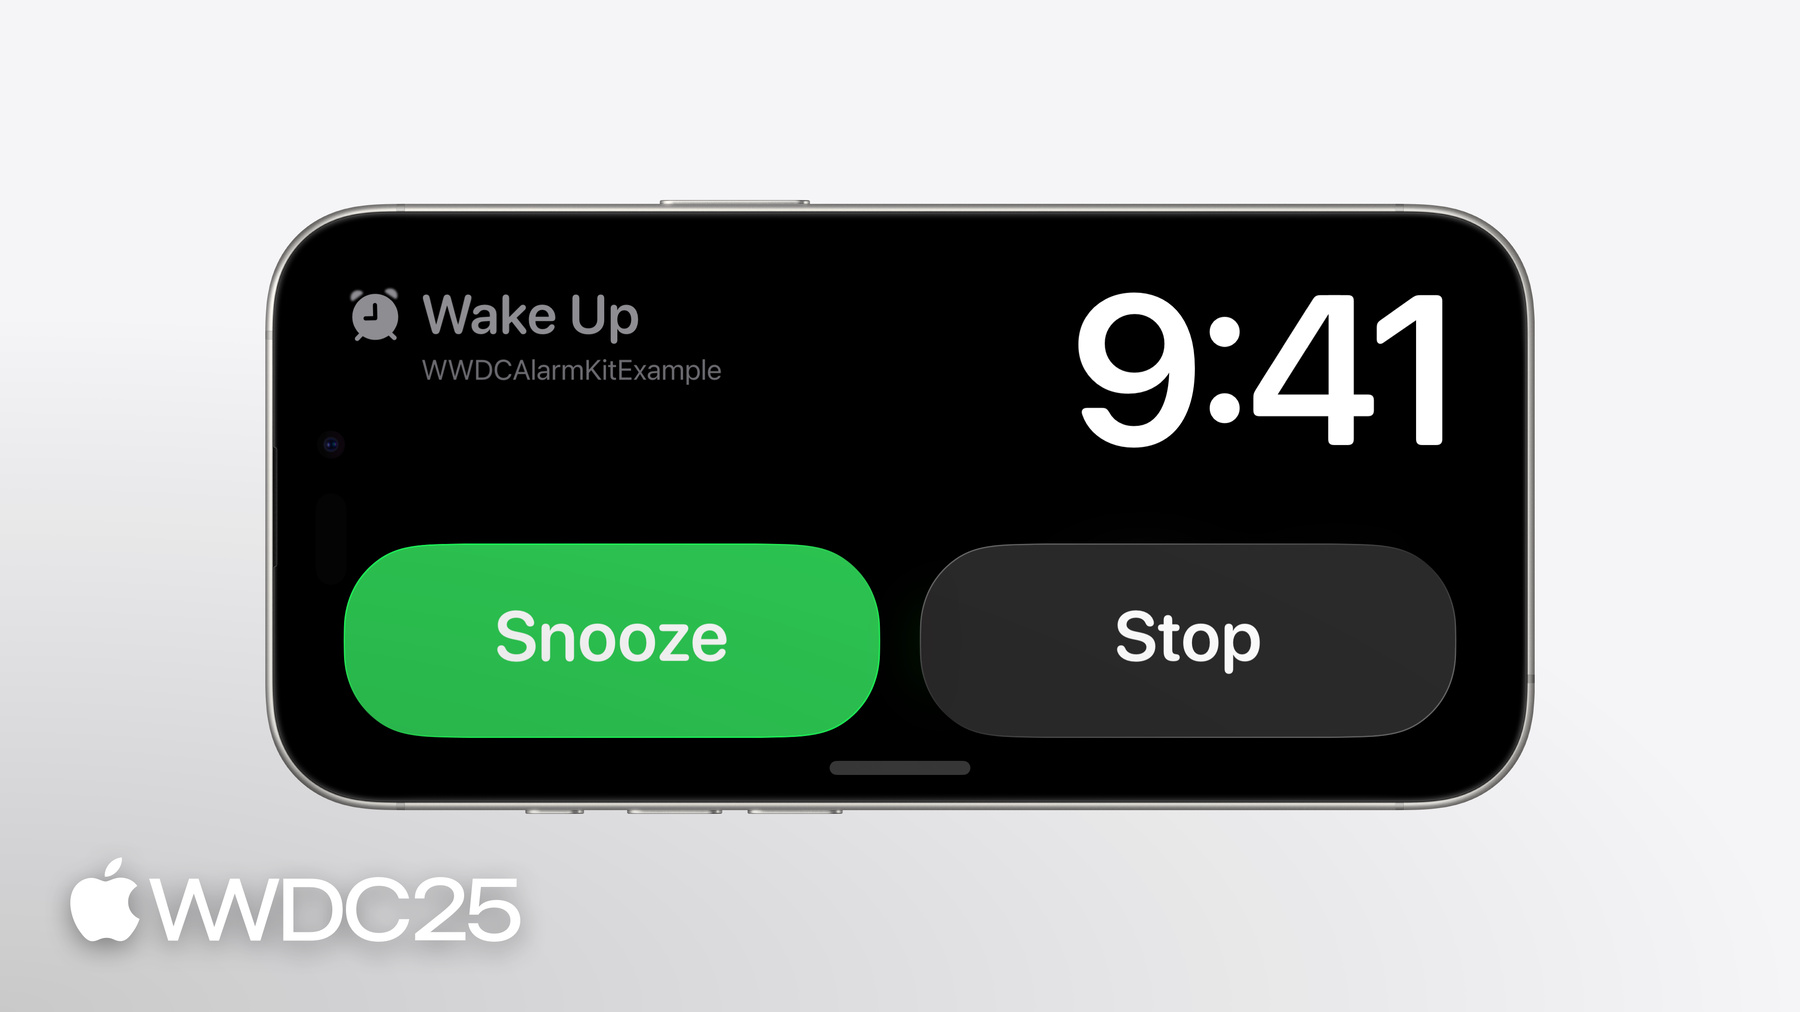
System Experienceチームの エンジニアのAntonです このセッションではAlarmKitを紹介します アプリでアラームを作成できる フレームワークです このビデオでは まず最初にAlarmKitでできること について説明します 次に このフレームワークを使用するための アプリの許可を取る方法 アラームの作成方法 ライフサイクルの管理方法を説明します まず 何ができるかを説明します アラームは 決められた一定の時刻の イベントについて 目立つように 通知するものです スケジュール型とカウントダウン型があります アラートが実行されると サイレントモードが解除され 現在のフォーカスが変わります
アラートでは カスタムの アラームタイトルとアプリの名前が ユーザーに表示されます アラートを停止するオプションに加え オプションのスヌーズボタンで スヌーズすることもできます
また カスタムボタンの表示もできます ボタンの アクションはApp Intentで定義します
アラームは スタンバイなど 他のシステム エクスペリエンスでもサポートされており アラームの実行時にiPhoneとペアリング されていればApple Watchでも利用できます
アラームでは カスタムのカウントダウン インターフェイスがサポートされます それには アプリが提供するライブ アクティビティを使用します これはロック画面でも Dynamic Islandおよび スタンバイでも表示できます
ユーザーは デバイスでアプリごとに アラーム機能の有効化を選択します アラームの概要を確認したので アプリによるアラームの設定を ユーザーが許可できるように する方法を説明します
アプリでアラームを設定するには 事前に その許可についてユーザーの 同意が得られている必要があります 手動で許可を求めることができますが 初めてアラームを作成すると 自動的に許可が求められます ユーザーはいつでも設定アプリで 許可のステータスを変更できます 許可の設定は簡単です 必要なことは NSAlarmKitUsageDescriptionを アプリのinfo.plistに追加して アラームを表示するユースケースの 説明を記述するだけです アプリでどのようにアラームが 使用されるかを 簡潔に説明することで ユーザーが適切に判断できるようにします 手動で許可を求めるには AlarmManagerの requestAuthorization APIを使用できます
事前に選択が行われていない場合 使用に関する説明を含む プロンプトが表示されます
アラームのスケジュールを設定する前に 許可のステータスを確認できます それには AlarmManagerクラスの authorizationStateを照会します
この場合 未選択の場合は 手動で許可のリクエストができます 許可されている場合 アラームの 設定を進めることができます 拒否された場合は アプリのインターフェイスで アラームが設定されないことを 明示することが重要です アラーム設定の許可について確認したので アラームの作成方法について説明します アラーム作成に必要な主な要素としては カウントダウン時間 特定の日時のスケジュール または繰り返しのパターン 外観の設定 カスタムアクションの処理 サウンドの設定があります
カウントダウン時間から始めましょう アラームには アラート前とアラート後の カウントダウン時間を設定できます アラームの初回のスケジュール設定では カウントダウンのUIが表示されます ここで表示されるのは アラート前の カウントダウン時間です アラート前の時間が経過すると アラームが鳴り アラートUIが表示されます これは設定でカスタマイズされたものです
アラームでスヌーズが設定されている場合 アラート後の時間に応じて カウントダウンのUIが再度表示されます
この時間が経過すると 再びアラームが鳴ります これはスヌーズするか停止できます
この例では タイマーを設定しています アラート前の時間は10分です アラーム鳴動後 繰り返します アラート後の時間5分をカウントダウンし 再度鳴動します アラームを作成する場合 スケジュールを指定することもできます これは 固定または相対で指定できます
固定のスケジュールでは 未来の単一の 日時を指定すると アラームで通知されます このスケジュールは絶対的なもので デバイスのタイムゾーンが変更されても 変わりません この例では WWDCの基調講演に合わせて アラームが鳴るように設定しています DateComponentsを作成し 6月9日午前9時41分を設定します これらのコンポーネントを使用して 日時を作成します
次に fixedのイニシャライザを使用して アラームスケジュールに日時を渡します アラームに相対的なスケジュールを 指定することもできます この場合は 時刻と オプションで 週次の繰り返しパターンを指定します 相対的なスケジュールでは タイムゾーンの変更が考慮されます
この例では アラームのスケジュールを 毎週月曜日 水曜日 金曜日の 午前7時に設定しています Timeのhourとminuteを設定し 日次の繰り返しを指定します
アラームのスケジュールの設定方法を 説明しましたので アラームの外観のカスタマイズに進みます さまざまな要素をカスタマイズできます アプリでクッキングタイマーを 作成しましょう 鳴動するときのアラートの表示を カスタマイズします まず アラートのボタンを作成します これには AlarmButton構造体を 使用します これで ボタンのテキストとテキストの色 システムイメージを指定できます
これで停止ボタンを定義します タイトルは「Dismiss」とし テキストの色は白にします
SF Symbolsも含めます これは Dynamic Islandに アラートを表示する際に使用されます
これで アラートの表示を作成して 料理ができたことを知らせる アラートタイトルを設定できます 先ほど作成した停止ボタンも含めます 次に アラームの属性を作成します これは アラーム表示のレンダリングに 必要な情報と考えることができます 先ほど作成したalertPresentationを presentationパラメータで渡します 最後に アラーム設定を作成します これは アラームのスケジュール設定に 必要なすべての要素と考えてください カウントダウン時間やスケジュール 属性が含まれます attributesを alarmConfigurationに渡します
これでアラームのアラート表示に 停止ボタンを設定できました
アラートを表示するだけのアラームの場合 外観を設定するために 必要なことはこれだけです しかし アラームでカウントダウンの インターフェイスを表示する場合は さらにいくつかの手順を踏む必要があります 先ほどのクッキングアラームの例で 説明を続けます まず アラートでカウントダウンを 開始するための繰り返しボタンを追加します
AlarmButton構造体を使用して 繰り返しボタンを作成し タイトルに「Repeat」と設定します テキストの色を白にし 繰り返しのアイコンを設定します これは Dynamic Islandでアラームの 通知が行われるときに表示されます
アラートの表示を作成する際 繰り返しボタンも含めます
secondaryButtonBehaviorパラメータでは セカンダリボタンで タイマーの繰り返し やアラームのスヌーズのように カウントダウン状態に移行するか またはカスタムアクションを実行するかを 指定します ここでは Repeatボタンがタップされたら アラートをカウントダウンに 移行させることにします それには secondaryButtonBehaviorに countdownを指定します 先ほどと同様 AlarmAttributesを作成し AlertPresentationを指定して AlarmConfigurationに これらの属性を含めます これで カウントダウンを開始する 繰り返しボタンを アラートに追加できました 次に カウントダウンのUIを表示するライブ アクティビティを実装する必要があります アラームでカウントダウン機能を サポートする場合 アプリでライブアクティビティを使って この機能を実装する必要があります その方法をお見せします 調理時間が経過したら通知する カウントダウンを作成します これは ロック画面とDynamic Island スタンバイ画面に表示されます
ライブアクティビティの作成方法を ご存知であれば カウントダウン用の カスタムインターフェイスを作成する 方法はすでにお分かりでしょう カウントダウンのライブアクティビティを アプリのWidget Extensionに追加します
これがないと アラームは鳴動しません WWDC23の「ActivityKitについて」という ビデオで手順を説明しています 次に ActivityConfigurationを設定し メタデータの種類とともに AlarmAttributesを指定します
この例では ActivityConfigurationを設定し AlarmAttributesとCookingData メタデータを使用するよう指定します まず ロック画面についてです アラームのカウントダウンの状態は countdownまたはpausedです それぞれの状態に対応する ビューを用意します
それには contextオブジェクトで アラームの現在のモードを確認し 適切なビューをレンダリングします
まず countdown状態の処理として countdownViewを指定します 次に paused状態の処理として pausedViewを指定します 次に Dynamic Islandの 拡張領域の表示を設定します アラームのタイトルとカウントダウン そしてボタンを含めます 次に コンパクトとミニサイズの Dynamic Islandビューを設定します これにはアラームのカウントダウンと アイコンを含めます 基本的なライブアクティビティの カウントダウンを設定したので 調理方法を示すアイコンを追加しましょう この追加情報はAlarmMetadataで 指定できます このCookingDataは AlarmMetadata プロトコルに準拠した構造体です 文字列の列挙型を定義して 調理方法を指定します オプションとして フライとグリルを追加します 次に 調理方法を格納する プロパティを作成します これで CookingDataメタデータを 使用する準備が整いました アプリでアラームを設定するときに CookingDataブジェクトを作成し 調理方法として フライ(frying)を指定します AlarmAttributesを作成するときに このcustomMetatadaを含めます
ライブアクティビティで context属性を使って カスタムメタデータの調理方法に アクセスします
これで 調理方法を使用して アイコンを作成できます カウントダウンがレンダリングされると CookingDataメタデータの 調理方法をもとに生成した フライのアイコンが表示されます これをロック画面とDynamic Islandの 両方で使用します
これで ライブアクティビティを使用して アラームのカウントダウンを設定できました AlarmMetadataを使って カウントダウン アラームのカスタムアイコンも作成しました
アラームでカウントダウン機能を サポートする場合 カウントダウンインターフェイスの表示は システムが保証します 場合によっては ライブアクティビティを 表示できないこともあります 例えば デバイスが再起動された後 初めてロックが解除される前などです その場合でも システムによる カウントダウンの表示を カスタマイズできます 次は クッキングアラームのカウントダウン 用のシステム表示の設定です まず AlarmButton構造体を使用して 一時停止ボタンを定義し システムのpauseアイコンを設定します
次に countdownPresentationを作成して 調理中とわかるようにタイトルを設定し 一時停止ボタンを含めます
カウントダウン表示の定義ができたので AlarmAttributesの中に含めます このアラームでは 一時停止の 機能をサポートするので クッキングアラームのカウントダウンの 一時停止のシステム表示も設定します カウントダウンが一時停止された場合 ユーザーが再開できるようにします まず AlarmButton構造体を使用して 再開ボタンを定義し 再生のアイコンを設定します
次に pausedPresentationを作成し 一時停止がわかるようタイトルを設定します 再開ボタンも指定します
これで pausedPresentationを AlarmAttributesに追加できます これで アラートとカウントダウン 一時停止のシステム表示の処理ができました ここで Tint Colorについてお話します Tint Colorは表示全体で使用され アラームとアプリの関連性を ユーザーに伝えるのに役立ちます AlarmAttributesの中で指定します alertPresentationでは セカンダリボタンの塗りつぶし色を 設定するために使用されます
ロック画面では セカンダリボタンのシンボル およびアラームタイトルとカウントダウンに 色合いを付けるために使用されます 同様に Dynamic Islandでも 使用されます アラームの外観の設定について 説明してきたので アクションのカスタマイズに進みましょう AlarmKitを使用すると アラームボタンがタップされたときに 独自のコードを実行できます これには App Intentを使用します 停止ボタンやセカンダリボタン用の カスタムのApp Intentを指定できます カスタムのセカンダリボタンを作成して タップされたら アプリを開く App Intentを実行しましょう これを実現するには アラートの 外観を変更する必要があります まず AlarmButton構造体を使用して 開くボタンを作成します タイトルは「Open」で テキストの色は白です Dynamic Islandに矢印アイコンを表示します
alertPresentationを作成する際に セカンダリボタンとして Openボタンを含めます
このボタンでカスタムアクションを 実行するために secondaryButtonのビヘイビアを customに変更します
カスタムのセカンダリボタンができました ボタンがタップされたらアプリを開くように App Intentを使ってアクションを設定します アプリを開くために このApp Intentを使用します ボタンがタップされた アラームのIDが含まれています openAppWhenRunフラグを trueに設定して このインテントの実行時に アプリを開くように指定します アプリが開かれたら 追加のタスクを実行できます このIDを持つアラームの 詳細ビューを表示するなどです 作成したインテントを使用してみます アラームを設定するときに 一意の識別子を作成し 作成後のアラームを追跡できるようにします OpenInAppインテントの インスタンスを作成し アラームの一意識別子を渡します
alarmConfigurationを作成する際に SecondaryIntentを含めて セカンダリボタンがタップされたときに 実行するインテントを システムに伝えます
これで カスタムのOpenボタンを アラートに追加し アプリを開くためのApp Intentを定義し Openボタンのタップ時にインテントを 実行するようシステムに指示しました それでは アラームのサウンドを 設定する方法について説明します サウンドのパラメータを指定しないと アラームでデフォルトの システムサウンドが使用されます アラームにカスタムサウンドを 指定することもできます AlarmKitではアラームの表示に ActivityKitを使用するため AlertSound構造体を使用して カスタムサウンドを定義できます
サウンドファイルの名前を 指定する必要があり このサウンドファイルは アプリのメインバンドルまたは アプリのデータコンテナのLibrary/Sounds フォルダに格納されている必要があります アラームの設定が完了したら システムで管理できるようになります それには AlarmManager クラスを使用します アラームの設定ができたら システムでスケジュールを設定できます それには アラームの一意の識別子と 先ほど作成した設定を使用します この識別子を使って ライフサイクル 全体を通じてアラームを追跡します
アラームのライフサイクルを 完全にコントロールできます 状態をcountdown、cancel、stop、pause またはresumeに遷移させることができます
AlarmKitを使用する際の ベストプラクティスをいくつか紹介します アラームは 一定時間カウントダウンする クッキングタイマーや スケジュール指定でアラートを繰り返す 目覚ましのアラームなどに役立ちます アラームは 重大な通知や 即時通知などの 他の目立つ通知の代わりにはなりません
アラートの表示は分かりやすさを心がけます アラートは目につく場所に表示されます 何のアラームなのか どのようなアクションができるのかが 簡単にわかるようにしましょう
カウントダウンに対応するアラームでは ライブアクティビティにカウントダウンの 重要な要素を含めることを検討してください 例えば 残り時間や停止ボタン 一時停止/再開のボタンなどです ここでは AlarmKitを使用して アラームを作成し システムでライフサイクルを 管理する方法を説明しました ぜひアプリで試してみてください AlarmKitを使用し アプリの用途に応じて アラームを設定します ライブアクティビティを使って ロック画面やDynamic Islandで カスタムのカウントダウン体験を 実現しましょう App Intentにより アラームに カスタムアクションを追加できます
今回はここまでです ご参加いただきありがとうございます
-
-
2:41 - Check authorization status
// Check authorization status import AlarmKit func checkAuthorization() { switch AlarmManager.shared.authorizationState { case .notDetermined: // Manually request authorization case .authorized: // Proceed with scheduling case .denied: // Inform status is not authorized } } -
4:08 - Set up the countdown duration
// Set up the countdown duration import AlarmKit func scheduleAlarm() { /* ... */ let countdownDuration = Alarm.CountdownDuration(preAlert: (10 * 60), postAlert: (5 * 60)) /* ... */ } -
4:40 - Set a fixed schedule
// Set a fixed schedule import AlarmKit func scheduleAlarm() { /* ... */ let keynoteDateComponents = DateComponents( calendar: .current, year: 2025, month: 6, day: 9, hour: 9, minute: 41) let keynoteDate = Calendar.current.date(from: keynoteDateComponents)! let scheduleFixed = Alarm.Schedule.fixed(keynoteDate) /* ... */ } -
5:13 - Set a relative schedule
// Set a relative schedule import AlarmKit func scheduleAlarm() { /* ... */ let time = Alarm.Schedule.Relative.Time(hour: 7, minute: 0) let recurrence = Alarm.Schedule.Relative.Recurrence.weekly([ .monday, .wednesday, .friday ]) let schedule = Alarm.Schedule.Relative(time: time, repeats: recurrence) /* ... */ } -
5:43 - Set up alert appearance with dismiss button
// Set up alert appearance with dismiss button import AlarmKit func scheduleAlarm() async throws { typealias AlarmConfiguration = AlarmManager.AlarmConfiguration<CookingData> let id = UUID() let duration = Alarm.CountdownDuration(preAlert: (10 * 60), postAlert: (5 * 60)) let stopButton = AlarmButton( text: "Dismiss", textColor: .white, systemImageName: "stop.circle") let alertPresentation = AlarmPresentation.Alert( title: "Food Ready!", stopButton: stopButton) let attributes = AlarmAttributes<CookingData>( presentation: AlarmPresentation( alert: alertPresentation), tintColor: Color.green) let alarmConfiguration = AlarmConfiguration( countdownDuration: duration, attributes: attributes) try await AlarmManager.shared.schedule(id: id, configuration: alarmConfiguration) } -
7:17 - Set up alert appearance with repeat button
// Set up alert appearance with repeat button import AlarmKit func scheduleAlarm() async throws { typealias AlarmConfiguration = AlarmManager.AlarmConfiguration<CookingData> let id = UUID() let duration = Alarm.CountdownDuration(preAlert: (10 * 60), postAlert: (5 * 60)) let stopButton = AlarmButton( text: "Dismiss", textColor: .white, systemImageName: "stop.circle") let repeatButton = AlarmButton( text: "Repeat", textColor: .white, systemImageName: "repeat.circle") let alertPresentation = AlarmPresentation.Alert( title: "Food Ready!", stopButton: stopButton, secondaryButton: repeatButton, secondaryButtonBehavior: .countdown) let attributes = AlarmAttributes<CookingData>( presentation: AlarmPresentation(alert: alertPresentation), tintColor: Color.green) let alarmConfiguration = AlarmConfiguration( countdownDuration: duration, attributes: attributes) try await AlarmManager.shared.schedule(id: id, configuration: alarmConfiguration) } -
9:15 - Create a Live Activity for a countdown
// Create a Live Activity for a countdown import AlarmKit import ActivityKit import WidgetKit struct AlarmLiveActivity: Widget { var body: some WidgetConfiguration { ActivityConfiguration(for: AlarmAttributes<CookingData>.self) { context in switch context.state.mode { case .countdown: countdownView(context) case .paused: pausedView(context) case .alert: alertView(context) } } dynamicIsland: { context in DynamicIsland { DynamicIslandExpandedRegion(.leading) { leadingView(context) } DynamicIslandExpandedRegion(.trailing) { trailingView(context) } } compactLeading: { compactLeadingView(context) } compactTrailing: { compactTrailingView(context) } minimal: { minimalView(context) } } } } -
10:26 - Create custom metadata for the Live Activity
// Create custom metadata for the Live Activity import AlarmKit struct CookingData: AlarmMetadata { let method: Method init(method: Method) { self.method = method } enum Method: String, Codable { case frying = "frying.pan" case grilling = "flame" } } -
10:43 - Provide custom metadata to the Live Activity
// Provide custom metadata to the Live Activity import AlarmKit func scheduleAlarm() async throws { typealias AlarmConfiguration = AlarmManager.AlarmConfiguration<CookingData> let id = UUID() let duration = Alarm.CountdownDuration(preAlert: (10 * 60), postAlert: (5 * 60)) let customMetadata = CookingData(method: .frying) let stopButton = AlarmButton( text: "Dismiss", textColor: .white, systemImageName: "stop.circle") let repeatButton = AlarmButton( text: "Repeat", textColor: .white, systemImageName: "repeat.circle") let alertPresentation = AlarmPresentation.Alert( title: "Food Ready!", stopButton: stopButton, secondaryButton: repeatButton, secondaryButtonBehavior: .countdown) let attributes = AlarmAttributes<CookingData>( presentation: AlarmPresentation(alert: alertPresentation), metadata: customMetadata, tintColor: Color.green) let alarmConfiguration = AlarmConfiguration( countdownDuration: duration, attributes: attributes) try await AlarmManager.shared.schedule(id: id, configuration: alarmConfiguration) } -
11:01 - Use custom metadata in the Live Activity
// Use custom metadata in the Live Activity import AlarmKit import ActivityKit import WidgetKit struct AlarmLiveActivity: Widget { var body: some WidgetConfiguration { /* ... */ } func alarmIcon(context: ActivityViewContext<AlarmAttributes<CookingData>>) -> some View { let method = context.attributes.metadata?.method ?? .grilling return Image(systemName: method.rawValue) } } -
12:03 - Set up the system countdown appearance
// Set up the system countdown appearance import AlarmKit func scheduleAlarm() async throws { typealias AlarmConfiguration = AlarmManager.AlarmConfiguration<CookingData> let id = UUID() let duration = Alarm.CountdownDuration(preAlert: (10 * 60), postAlert: (5 * 60)) let customMetadata = CookingData(method: .frying) let stopButton = AlarmButton( text: "Dismiss", textColor: .white, systemImageName: "stop.circle") let repeatButton = AlarmButton( text: "Repeat", textColor: .white, systemImageName: "repeat.circle") let alertPresentation = AlarmPresentation.Alert( title: "Food Ready!", stopButton: stopButton, secondaryButton: repeatButton, secondaryButtonBehavior: .countdown) let pauseButton = AlarmButton( text: "Pause", textColor: .green, systemImageName: "pause") let countdownPresentation = AlarmPresentation.Countdown( title: "Cooking", pauseButton: pauseButton) let attributes = AlarmAttributes<CookingData>( presentation: AlarmPresentation( alert: alertPresentation, countdown: countdownPresentation), metadata: customMetadata, tintColor: Color.green) let alarmConfiguration = AlarmConfiguration( countdownDuration: duration, attributes: attributes) try await AlarmManager.shared.schedule(id: id, configuration: alarmConfiguration) } -
12:43 - Set up the system paused appearance
// Set up the system paused appearance import AlarmKit func scheduleAlarm() async throws { typealias AlarmConfiguration = AlarmManager.AlarmConfiguration<CookingData> let id = UUID() let duration = Alarm.CountdownDuration(preAlert: (10 * 60), postAlert: (5 * 60)) let customMetadata = CookingData(method: .frying) let stopButton = AlarmButton( text: "Dismiss", textColor: .white, systemImageName: "stop.circle") let repeatButton = AlarmButton( text: "Repeat", textColor: .white, systemImageName: "repeat.circle") let alertPresentation = AlarmPresentation.Alert( title: "Food Ready!", stopButton: stopButton, secondaryButton: repeatButton, secondaryButtonBehavior: .countdown) let pauseButton = AlarmButton( text: "Pause", textColor: .green, systemImageName: "pause") let countdownPresentation = AlarmPresentation.Countdown( title: "Cooking", pauseButton: pauseButton) let resumeButton = AlarmButton( text: "Resume", textColor: .green, systemImageName: "play") let pausedPresentation = AlarmPresentation.Paused( title: "Paused", resumeButton: resumeButton) let attributes = AlarmAttributes<CookingData>( presentation: AlarmPresentation( alert: alertPresentation, countdown: countdownPresentation, paused: pausedPresentation), metadata: customMetadata, tintColor: Color.green) let alarmConfiguration = AlarmConfiguration( countdownDuration: duration, attributes: attributes) try await AlarmManager.shared.schedule(id: id, configuration: alarmConfiguration) } -
14:09 - Add a custom button
// Add a custom button import AlarmKit import AppIntents func scheduleAlarm() async throws { typealias AlarmConfiguration = AlarmManager.AlarmConfiguration<CookingData> let id = UUID() let duration = Alarm.CountdownDuration(preAlert: (10 * 60), postAlert: (5 * 60)) let customMetadata = CookingData(method: .frying) let secondaryIntent = OpenInApp(alarmID: id.uuidString) let stopButton = AlarmButton( text: "Dismiss", textColor: .white, systemImageName: "stop.circle") let openButton = AlarmButton( text: "Open", textColor: .white, systemImageName: "arrow.right.circle.fill") let alertPresentation = AlarmPresentation.Alert( title: "Food Ready!", stopButton: stopButton, secondaryButton: openButton, secondaryButtonBehavior: .custom) let pauseButton = AlarmButton( text: "Pause", textColor: .green, systemImageName: "pause") let countdownPresentation = AlarmPresentation.Countdown( title: "Cooking", pauseButton: pauseButton) let resumeButton = AlarmButton( text: "Resume", textColor: .green, systemImageName: "play") let pausedPresentation = AlarmPresentation.Paused( title: "Paused", resumeButton: resumeButton) let attributes = AlarmAttributes<CookingData>( presentation: AlarmPresentation( alert: alertPresentation, countdown: countdownPresentation, paused: pausedPresentation), metadata: customMetadata, tintColor: Color.green) let alarmConfiguration = AlarmConfiguration( countdownDuration: duration, attributes: attributes, secondaryIntent: secondaryIntent) try await AlarmManager.shared.schedule(id: id, configuration: alarmConfiguration) } public struct OpenInApp: LiveActivityIntent { public func perform() async throws -> some IntentResult { .result() } public static var title: LocalizedStringResource = "Open App" public static var description = IntentDescription("Opens the Sample app") public static var openAppWhenRun = true @Parameter(title: "alarmID") public var alarmID: String public init(alarmID: String) { self.alarmID = alarmID } public init() { self.alarmID = "" } } -
16:10 - Add a custom sound
// Add a custom sound

import AlarmKit
import AppIntents

func scheduleAlarm() async throws {
  typealias AlarmConfiguration = AlarmManager.AlarmConfiguration<CookingData>

  let id = UUID()
  let duration = Alarm.CountdownDuration(preAlert: (10 * 60), postAlert: (5 * 60))
  let customMetadata = CookingData(method: .frying)
  let secondaryIntent = OpenInApp(alarmID: id.uuidString)

  let stopButton = AlarmButton(
    text: "Dismiss",
    textColor: .white,
    systemImageName: "stop.circle")

  let openButton = AlarmButton(
    text: "Open",
    textColor: .white,
    systemImageName: "arrow.right.circle.fill")

  let alertPresentation = AlarmPresentation.Alert(
    title: "Food Ready!",
    stopButton: stopButton,
    secondaryButton: openButton,
    secondaryButtonBehavior: .custom)

  let pauseButton = AlarmButton(
    text: "Pause",
    textColor: .green,
    systemImageName: "pause")

  let countdownPresentation = AlarmPresentation.Countdown(
    title: "Cooking",
    pauseButton: pauseButton)

  let resumeButton = AlarmButton(
    text: "Resume",
    textColor: .green,
    systemImageName: "play")

  let pausedPresentation = AlarmPresentation.Paused(
    title: "Paused",
    resumeButton: resumeButton)

  let attributes = AlarmAttributes<CookingData>(
    presentation: AlarmPresentation(
      alert: alertPresentation,
      countdown: countdownPresentation,
      paused: pausedPresentation),
    metadata: customMetadata,
    tintColor: Color.green)

  let sound = AlertConfiguration.AlertSound.named("Chime")

  let alarmConfiguration = AlarmConfiguration(
    countdownDuration: duration,
    attributes: attributes,
    secondaryIntent: secondaryIntent,
    sound: sound)

  try await AlarmManager.shared.schedule(id: id, configuration: alarmConfiguration)

}

public struct OpenInApp: LiveActivityIntent {
    public func perform() async throws -> some IntentResult { .result() }

    public static var title: LocalizedStringResource = "Open App"
    public static var description = IntentDescription("Opens the Sample app")
    public static var openAppWhenRun = true

    @Parameter(title: "alarmID")
    public var alarmID: String

    public init(alarmID: String) {
        self.alarmID = alarmID
    }

    public init() {
        self.alarmID = ""
    }
}
-
-
- 0:00 - ようこそ
AlarmKit is a new framework you can use to create alarms. Learn about user experience, app authorization, alarm creation, and life cycle management.
- 0:32 - 概要
Alarms are scheduled or countdown-based alerts that break through silent mode, displaying a custom title and app name. People can stop, snooze, or interact with custom buttons. Alarms are visible on Lock Screen, Dynamic Island, StandBy, and Apple Watch, and people must opt-in per app.
- 1:39 - 許可
To enable alarm scheduling in an app, people must authorize it. This can be done automatically upon creating the first alarm or manually via the AlarmManager's 'requestAuthorization' API. You must add 'NSAlarmKitUsageDescription' to the Info.plist explaining how alarms are used. People can change authorization status in Settings. Before scheduling an alarm, the app needs to check authorization status; if denied, it needs to inform users.
- 3:06 - 作成
Creating an alarm involves several key components. First, the alarm must be set with a countdown duration, which can include both a pre-alert and post-alert interval. When the alarm is scheduled, it displays a countdown UI for the pre-alert duration. Once this time elapses, the alarm fires, showing a customized alert UI. If the alarm is snoozed, the countdown UI reappears for the post-alert interval before firing again. Alarms can be scheduled using either a fixed or relative schedule. A fixed schedule specifies a single future date and time, while a relative schedule allows for a daily time of day with an optional weekly recurrence pattern, ensuring the alarm adjusts correctly for time zone changes. In addition to scheduling, you can also customize the appearance of the alarm. This includes creating and configuring alert buttons, such as a 'Dismiss' button, and setting the alarm title. For alarms with countdown functionality, you can also add a 'Repeat' button. The alert presentation and attributes are then defined to specify how the alarm looks and behaves when it goes off. If an alarm includes countdown functionality, you must implement a Live Activity to display the countdown UI on the Lock Screen, Dynamic Island, and StandBy. This involves creating a custom interface for the countdown and setting up an 'ActivityConfiguration' with the appropriate alarm attributes. The Live Activity can display different views depending on whether the countdown is active or paused, providing a seamless user experience across various device states. This session demonstrates customizing the appearance and functionality of an alarm using AlarmKit and Live Activities in iOS by setting up different views for the Dynamic Island, including expanded, compact, and minimal modes, which display the alarm countdown and relevant information. To enhance the alarm's usefulness, the example introduces custom metadata. This metadata includes a custom enum, allowing the alarm to display an icon based on the enum's value on both the Lock Screen and in the Dynamic Island during the countdown. The session describes how to create custom app intents to run specific code when buttons are tapped, such as opening the app. It also describes how to configure the alarm sound, allowing people to choose a custom sound or use the default system sound.
- 16:32 - ライフサイクル
AlarmKit allows people to create, schedule, and manage alarms using the 'AlarmManager' class. Alarms can be configured, tracked via unique identifiers, and put into various states (countdown, paused, stopped, etc.). Best practices include using alarms for countdowns and recurring alerts, ensuring clear alert presentation, and utilizing Live Activities for countdowns.