-
SwiftUIでの高度なグラフィックエフェクトの組み合わせ
SwiftUIのレイアウトとグラフィックスに関するAPIをクリエイティブな方法で組み合わせて、充実したカスタム体験を生み出しましょう。複雑なデザインを分解し、クリエイティブパイプラインを使ってシンプルな構成要素をつなぎ合わせる方法を紹介します。レイヤーシェーダによる描画、タイムラインに沿ったアニメーション、アライメントガイドによるビューのアンカーについても解説します。
関連する章
- 0:00 - Introduction
- 1:40 - Design breakdown
- 4:11 - Cover art and shader effects
- 11:07 - Driving animation with time
- 12:00 - Time-synced transcript view
- 13:18 - Floating timestamps with alignment guides
- 16:16 - Creative pipelines
- 17:13 - Next steps
リソース
関連ビデオ
WWDC24
-
このビデオを検索
-
-
4:18 - Cover art image
Image("CoverArt") -
4:24 - Blurred cover art image
Image("CoverArt") .blur(radius: 30) -
7:09 - Applying layer effect in SwiftUI
GeometryReader { proxy in CoverArtView() .layerEffect( ShaderLibrary.backgroundWarp(), maxSampleOffset: .zero ) } .ignoresSafeArea() -
7:21 - Writing layer effect shader in Metal
[[stitchable]] half4 backgroundWarp( float2 position, SwiftUI::Layer layer ) { return layer.sample(position); } -
7:39 - Metal shader with offset parameter
[[stitchable]] half4 backgroundWarp( float2 position, SwiftUI::Layer layer, float2 offset ) { return layer.sample(position + offset); } -
7:55 - SwiftUI layer effect with offset parameter
GeometryReader { proxy in CoverArtView() .layerEffect( ShaderLibrary.backgroundWarp( .float2(.init(x: 0, y: 0)) ), maxSampleOffset: .zero ) } .ignoresSafeArea() -
8:04 - SwiftUI layer effect with full-width offset
GeometryReader { proxy in CoverArtView() .layerEffect( ShaderLibrary.backgroundWarp( .float2(.init(x: proxy.size.width, y: 0)) ), maxSampleOffset: .zero ) } .ignoresSafeArea() -
8:37 - SwiftUI layer effect with noise sampling
GeometryReader { proxy in CoverArtView() .layerEffect( ShaderLibrary.backgroundWarp( .float2(proxy.size), .image(Image("NoiseTexture")) ), maxSampleOffset: .zero ) } .ignoresSafeArea() -
8:55 - Metal shader with noise sampling
[[stitchable]] half4 backgroundWarp( float2 position, SwiftUI::Layer layer, float2 size, texture2d<half> noiseTex ) { constexpr sampler s(address::repeat, filter::linear); float2 uv = position / size; half4 n = noiseTex.sample(s, uv); float2 offset = (float2(n.r, n.g) - 0.5) * 200.0; return layer.sample(position + offset); } -
10:22 - Metal shader with domain warping
[[stitchable]] half4 backgroundWarp( float2 position, SwiftUI::Layer layer, float2 size, texture2d<half> noiseTex ) { constexpr sampler s(address::repeat, filter::linear); float2 uv = position / size; half4 n = noiseTex.sample(s, uv); float2 q = float2(n.r, n.g); n = noiseTex.sample(s, uv + q); float2 offset = (float2(n.r, n.g) - 0.5) * 200.0; return layer.sample(position + offset); } -
11:16 - SwiftUI layer effect with static visual
GeometryReader { proxy in CoverArtView() .layerEffect( ShaderLibrary.backgroundWarp( .float2(proxy.size), .image(Image("NoiseTexture")) ), maxSampleOffset: .zero ) } .ignoresSafeArea() -
11:37 - SwiftUI layer effect with animated visual
@State private var startDate = Date.now TimelineView(.animation) { timeline in let elapsed = timeline.date.timeIntervalSince( startDate ) CoverArtView() .layerEffect( ShaderLibrary.backgroundWarp( .float2(proxy.size), .image(Image("NoiseTexture")), .float(elapsed) ), maxSampleOffset: .zero ) } -
12:15 - Basic transcript view
ScrollView { LazyVStack(alignment: .leading, spacing: 12) { ForEach(sampleTranscript) { line in .font(.title) .fontWeight(.bold) } } } -
12:33 - Time-synced transcript view
@State private var playback = PlaybackState() ScrollViewReader { scrollProxy in ScrollView { LazyVStack(alignment: .leading, spacing: 12) { ForEach(sampleTranscript) { line in Text(line.text) .transcriptLineStyle(isCurrent: line.id == playback.currentLineIndex ) } } } .onChange(of: playback.currentLineIndex, { _, i in scrollProxy.scrollTo(i, anchor: .center) }) } -
13:53 - Overlay with center alignment
Text(line.text) .overlay { Text(line.formattedTimestamp) } -
14:06 - Overlay with bottom leading alignment
Text(line.text) .overlay(alignment: .bottomLeading) { Text(line.formattedTimestamp) } -
14:32 - Overlay with alignment guide override
Text(line.text)
     .overlay(alignment: .bottomLeading) {
          Text(line.formattedTimestamp)
              .alignmentGuide(.bottom) { $0[.top] }
     }
-
-
- 0:00 - Introduction
A way of thinking about advanced graphics and layout in SwiftUI as a creative pipeline — a series of stages that take data in, transform it, and pass it along.
- 1:40 - Design breakdown
Take a finished design and decompose it into pipeline stages. Working from a podcast app's existing UI — cover art, playback info, transcript text — see how each piece can be transformed and connected: a shader pipe converts cover art into a visualizer, a time pipe drives motion, and another time pipe syncs transcript scrolling.
- 4:11 - Cover art and shader effects
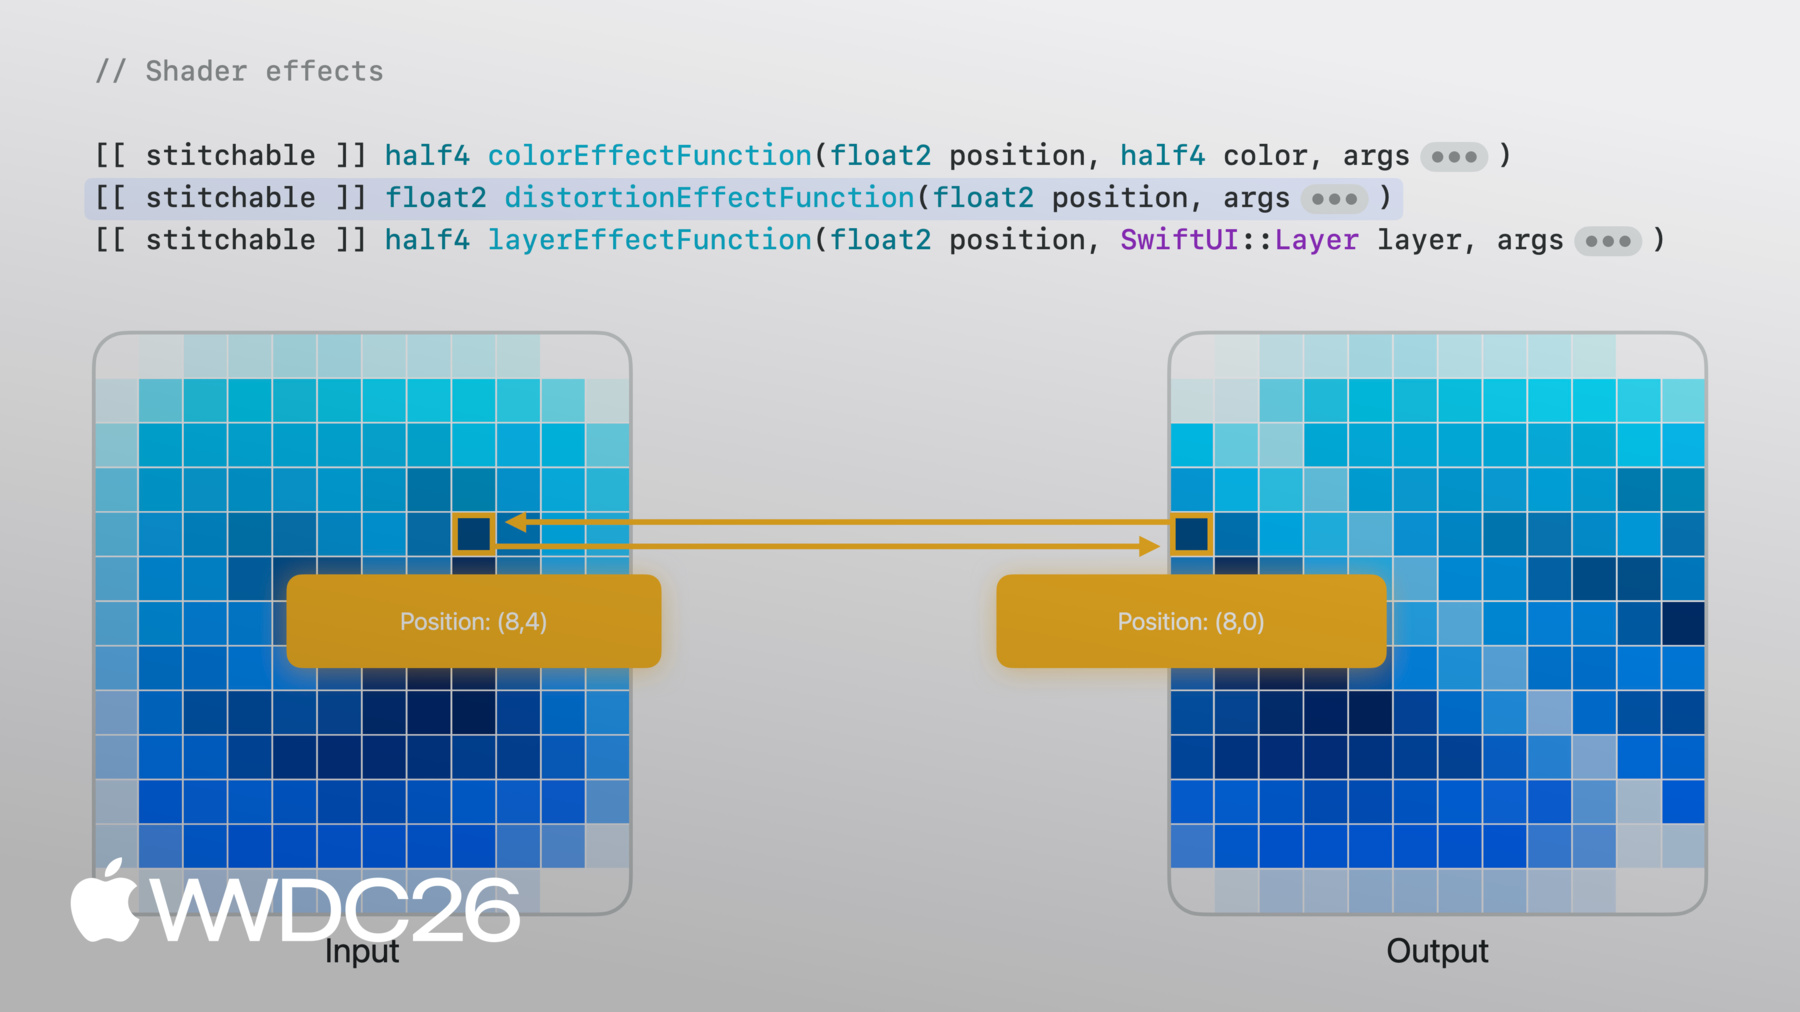
Soften the cover art with a blur, then layer on shader effects. Learn how shaders run per pixel on the GPU and how SwiftUI exposes them through three modifiers — color, distortion, and layer effects — each with different inputs and trade-offs. Build a layer-effect 'background warp' shader that samples a noise texture for organic, per-pixel offsets.
- 11:07 - Driving animation with time
Shaders are stateless — for animation, time has to come from outside. Use TimelineView to fire every frame with a timestamp, pass it into the shader, and watch the warp pattern flow as time advances.
- 12:00 - Time-synced transcript view
Build the foreground transcript using Text views in a LazyVStack inside a ScrollView. Use the playback timestamp to highlight the current line and fade the rest, then use onChange to scroll the current line to center as playback progresses.
- 13:18 - Floating timestamps with alignment guides
Position a small timestamp on the edge of the current line without resorting to manual offsets. Walk through how SwiftUI's alignment system pins views together at their alignment points, then use alignmentGuide to override an alignment semantically — moving the subview's bottom guide to its top edge so it floats neatly outside its container.
- 16:16 - Creative pipelines
Step back and see the pattern: each stage's output becomes the next stage's input. The same approach extends beyond this podcast app — swap audio for gyroscope data, a twist shader for a ripple, or a scroll view for a freeform canvas — to compose your own advanced effects.
- 17:13 - Next steps
Download the sample project, experiment with the shader, and look for opportunities in your own app where a small visual effect could make a big difference.